Why Installing Laminate Hardwood Flooring is Your Perfect Weekend Project
Learning to install laminate hardwood flooring is one of the most rewarding DIY projects you can tackle. This floating floor system snaps together without nails or glue, making it ideal for busy homeowners who want professional results in just a day or two.
Quick Installation Overview:
• Acclimate planks for 48-72 hours in the installation room
• Prepare subfloor – level within 3/16″ over 10 feet
• Install underlayment with vapor barrier if needed
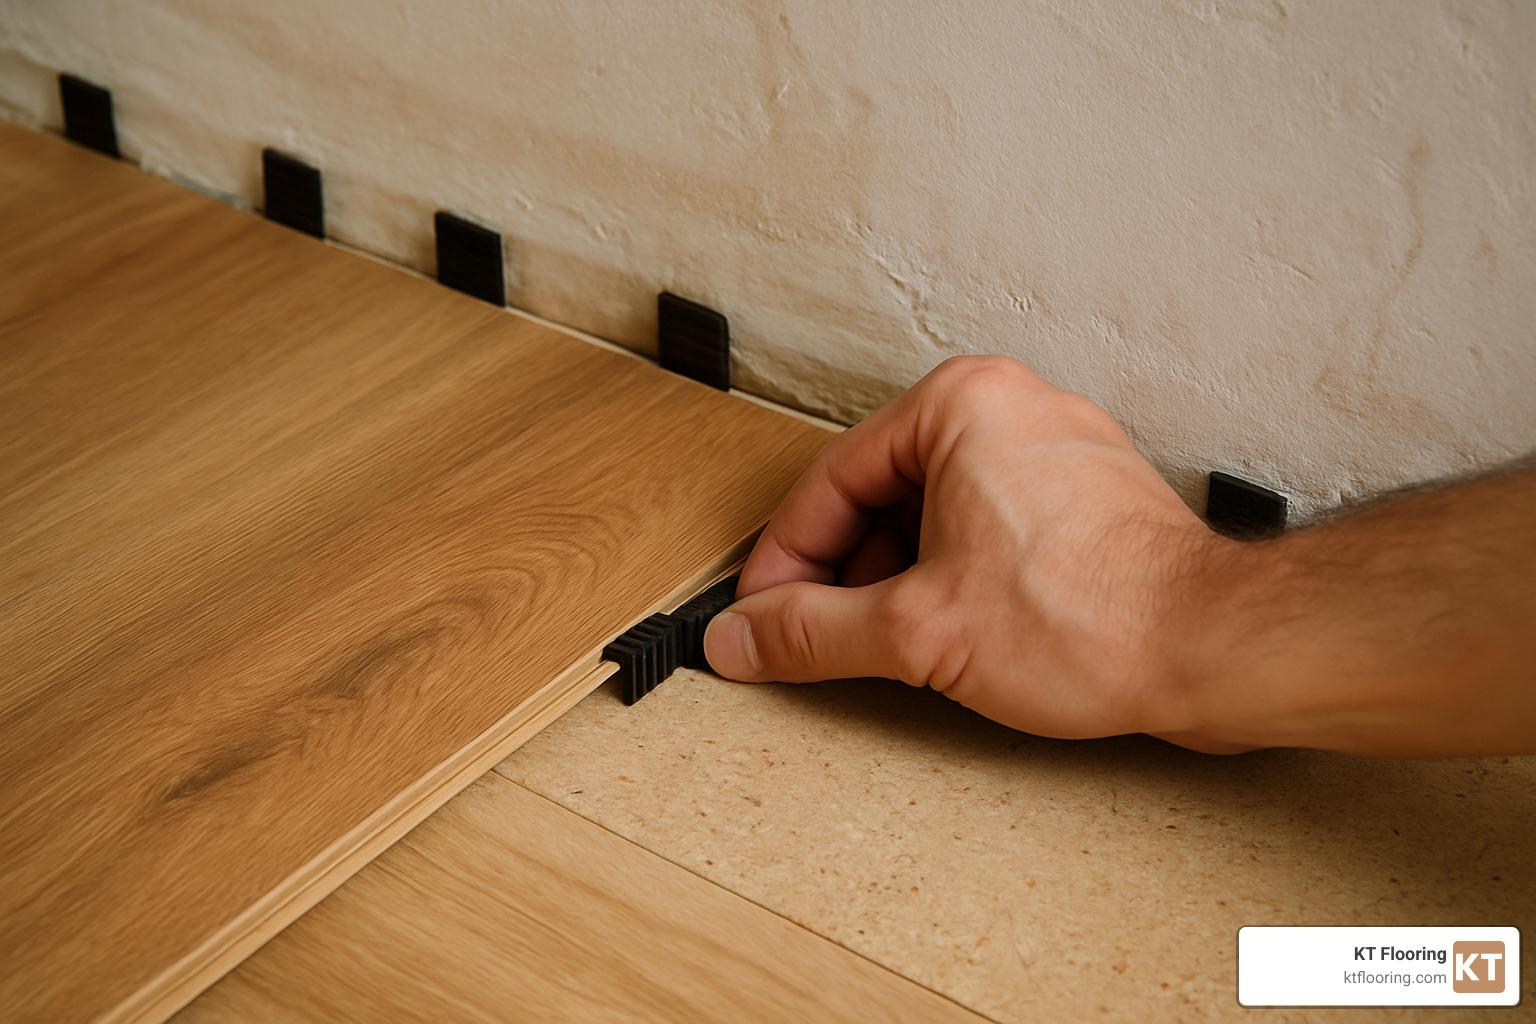
• Maintain 3/8″ expansion gap around all walls using spacers
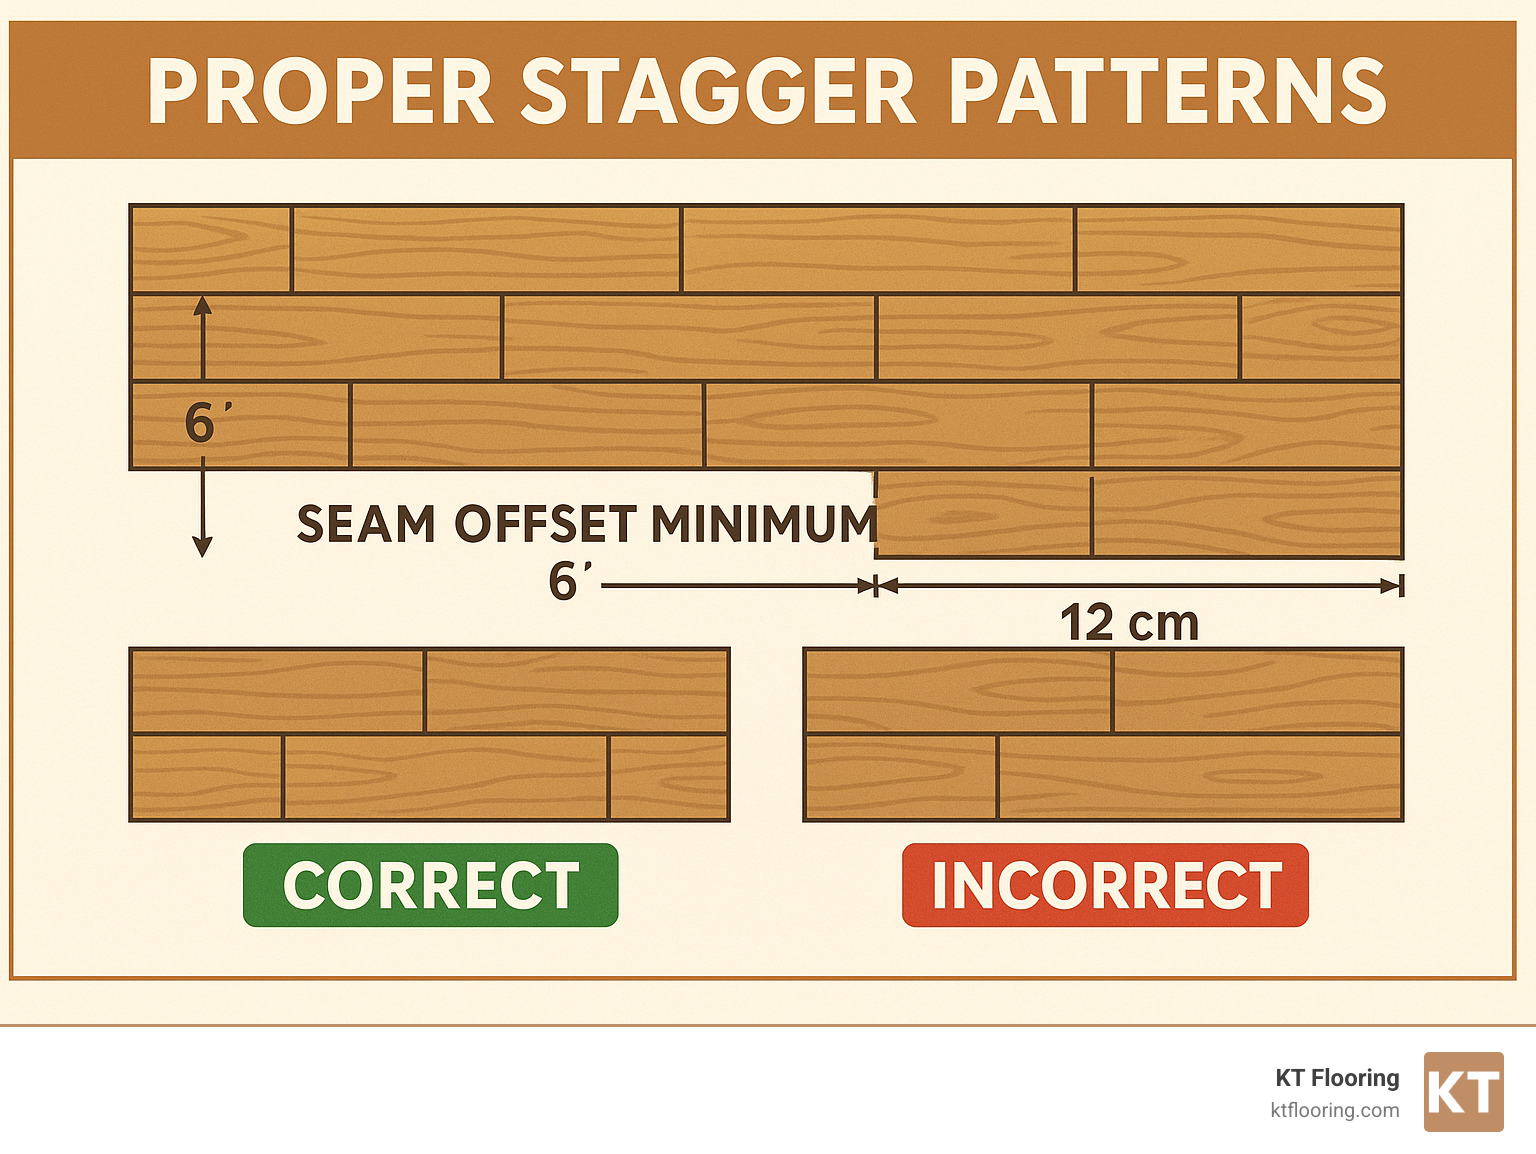
• Stagger seams by at least 6 inches between rows
• Purchase 10% extra material to cover cuts and mistakes
The beauty of laminate lies in its click-lock tongue-and-groove system. As one experienced installer noted, “laminate flooring installation is quick and relatively trouble-free for DIYers.” Unlike traditional hardwood, you won’t need specialized tools or professional experience.
Cost expectations range from $2-8 per square foot for DIY materials, while professional installation averages $6.62-11.33 per square foot (based on internet data, not KT Flooring pricing). The biggest time investment? Waiting for those planks to acclimate to your home’s temperature and humidity.
Modern laminate can handle heavy foot traffic, pets, and even moisture when you choose waterproof options. Plus, if you’re renting or love changing your décor, this floating floor can be removed and reinstalled elsewhere.
I’m Christopher Talty, owner of KT Flooring, and I’ve been helping New Hampshire homeowners install laminate hardwood flooring for over 50 years. My team has guided countless DIY enthusiasts through successful installations while providing professional backup when projects get complex.
Understanding Laminate Hardwood Flooring
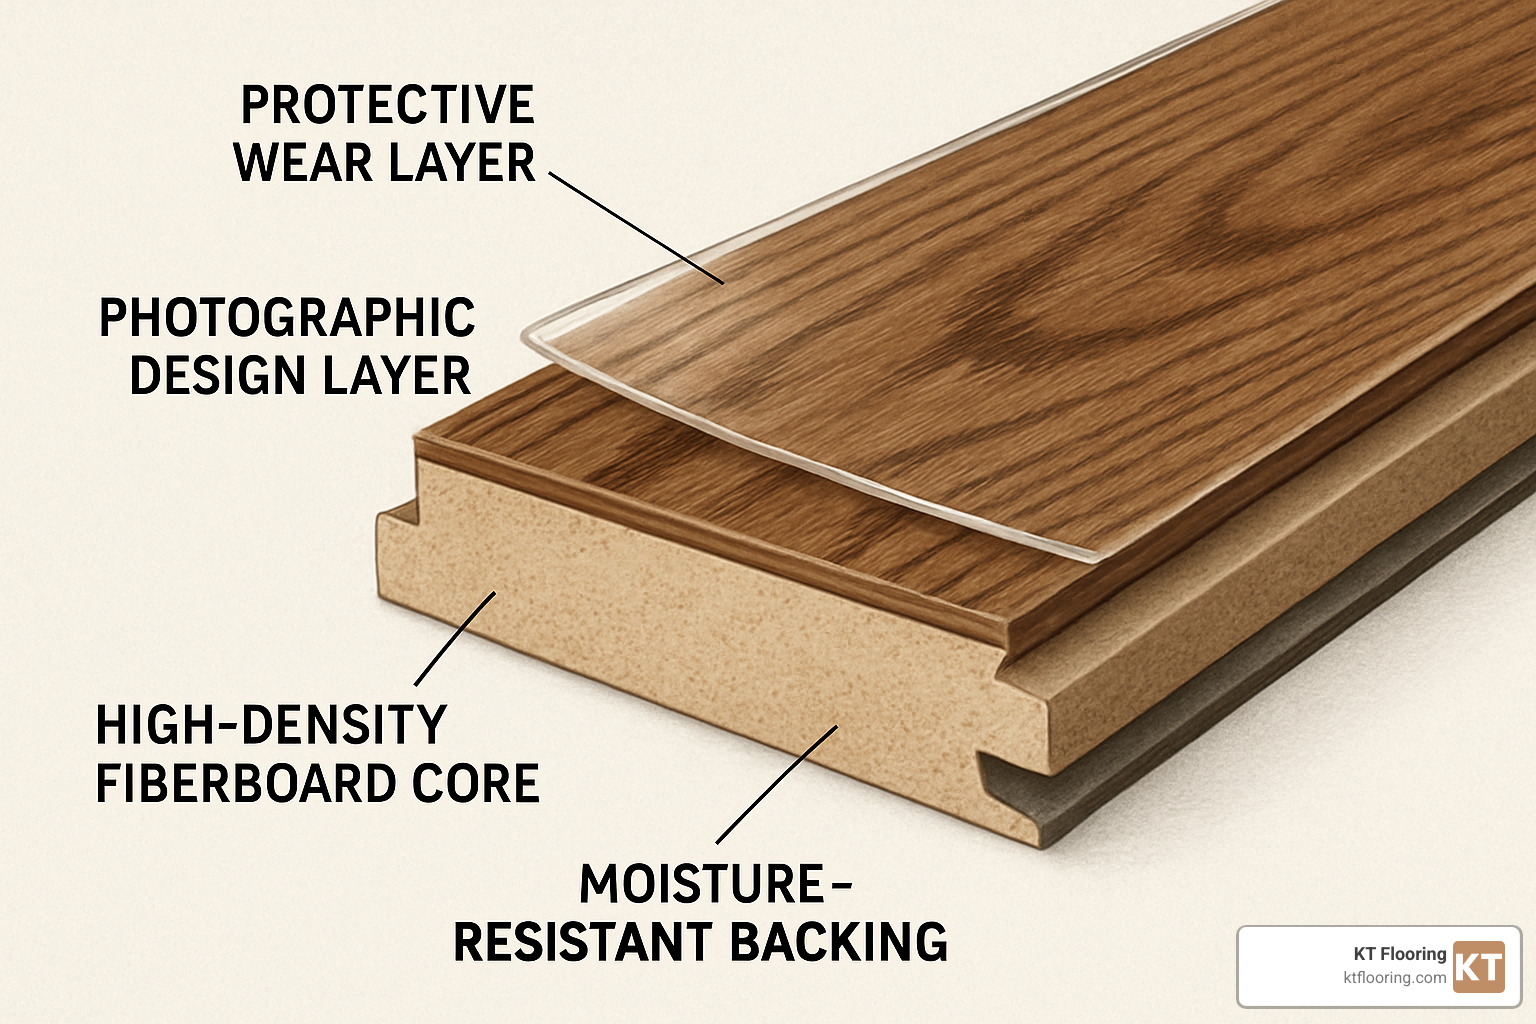
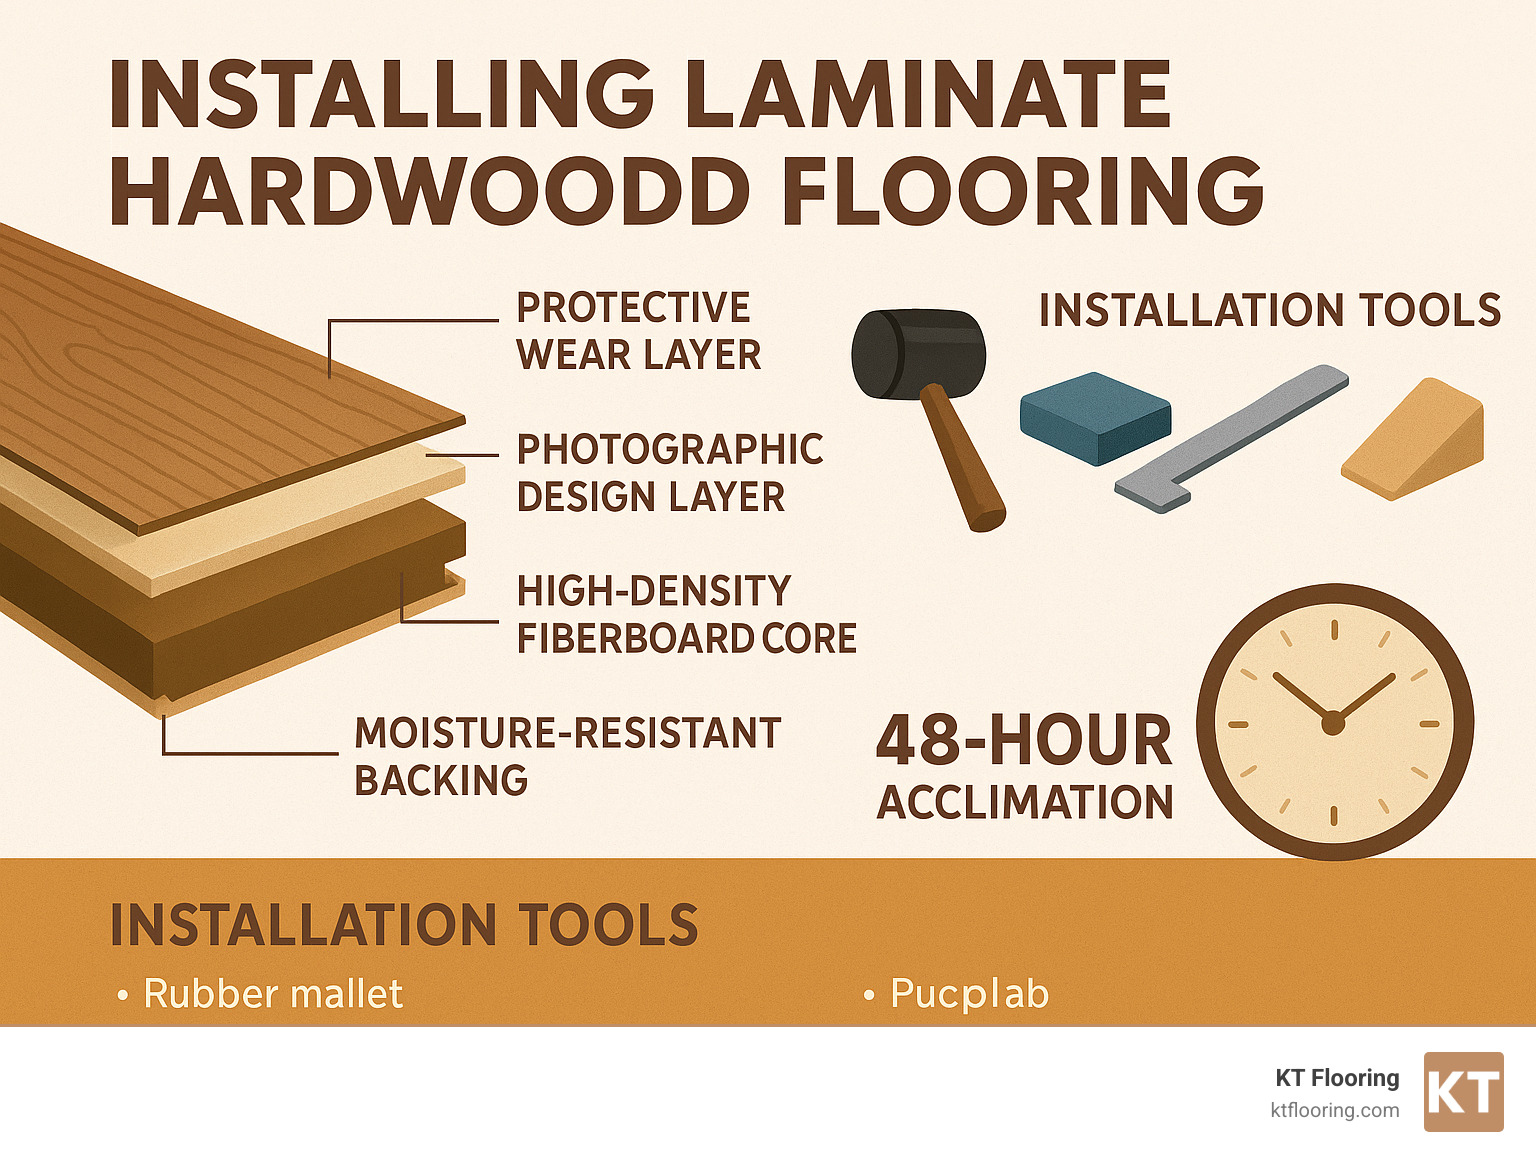
Think of laminate flooring as a carefully crafted sandwich. Each layer serves a specific purpose, working together to create a surface that looks like real wood but installs like a dream. When you install laminate hardwood flooring, you’re working with this engineered marvel that’s designed specifically for DIY success.
The wear layer on top is your floor’s bodyguard – a clear, tough coating that laughs at pet claws and furniture scratches. Beneath that sits the photographic layer, where the magic happens. This high-resolution image creates those gorgeous wood grain patterns that fool even your pickiest guests.
The fiberboard core is the muscle of the operation, providing stability and strength while keeping costs reasonable. Finally, the moisture-resistant backing protects against warping and cupping from below. This floating floor system sits happily on your subfloor without any nails or glue, held together by clever tongue-and-groove joints and good old gravity.
Cost varies dramatically depending on quality and features. Based on average internet data, basic laminate materials run $2-8 per square foot, while premium options can reach $15-25 per square foot. Compare that to solid hardwood at $3-10 for basic grades and $25-50+ for premium species, and you can see why laminate wins the budget battle.
Modern printing technology has revolutionized the appearance game. Today’s laminate captures authentic wood grain textures, hand-scraped details, and natural color variations that would make your grandfather’s laminate weep with envy. The aesthetic variety is stunning – from rustic barn wood to sleek contemporary planks.
For eco-conscious homeowners, laminate offers mixed news. While it contains synthetic materials, many manufacturers now use recycled content and low-emission formaldehyde-free cores. The durability factor also matters – a floor that lasts decades reduces replacement waste.
| Feature | Laminate | Solid Hardwood |
|---|---|---|
| Installation | DIY-friendly click-lock | Requires professional nailing/gluing |
| Water Resistance | Good to excellent (waterproof options) | Poor (refinishing possible) |
| Refinishing | Not possible | Multiple times over lifetime |
| Cost Range | $2-25/sq ft | $3-50+/sq ft |
| Durability | 15-25 years typical | 50+ years with maintenance |
| Maintenance | Simple cleaning | Periodic refinishing required |
For more detailed information about laminate options and styles, check out our Laminate Flooring guide.
Benefits & Drawbacks
The beauty of laminate lies in its easy maintenance – we’re talking simple sweeping and the occasional damp mop. No special cleaners, no refinishing schedules, no fuss. The scratch resistance comes from that protective wear layer, which handles everything from high heels to enthusiastic golden retrievers.
DIY installation is where laminate truly shines. That click-lock system means you don’t need years of experience or a truck full of specialized tools. Many homeowners complete entire rooms in a single weekend, feeling like flooring pros by Sunday evening.
Water resistance has improved dramatically, especially with waterproof laminate options that can handle spills, pet accidents, and even minor flooding. The cost effectiveness speaks for itself – you get the wood look without the wood price tag.
But let’s be honest about the challenges. Noise issues can drive you crazy if you skip proper underlayment. Walking across poorly installed laminate sounds like tap dancing on a drum. Limited refinishing means when it’s worn out, it’s replacement time – no sanding and staining to bring back that new-floor feeling.
Moisture sensitivity remains a concern, particularly at edges and joints where water can sneak in. Even waterproof laminate has its limits, and slippery surfaces when wet require extra caution, especially on stairs.
Where It Works (and Doesn’t)
Laminate loves above-grade areas like living rooms, bedrooms, and hallways where foot traffic is heavy but moisture is minimal. Basements work beautifully with proper vapor barriers, and kitchens are perfect candidates when you choose waterproof laminate.
High-traffic areas actually showcase laminate’s strengths – that wear layer was designed for busy families. Many products work wonderfully over radiant heat systems, though always check manufacturer specifications first.
Radiant heat compatibility varies by product, so verify before purchasing. The fiberboard core generally handles temperature changes well, but thermal expansion requirements may affect your installation plan.
Avoid saunas and steam rooms where extreme humidity causes even the best laminate to wave goodbye to its flat surface. Outdoor spaces are completely off-limits – laminate wasn’t designed for weather exposure. Wet areas without waterproof laminate spell disaster, and even waterproof versions have limits when facing standing water.
The good news? We can install laminate hardwood flooring in almost every room of your home, whether above or below ground, over wood or concrete. The key is matching the right product to the right environment and understanding your home’s unique challenges.
For more insights about different flooring options and their ideal applications, explore our Flooring Types guide.
Tools, Materials & Cost Planning
Getting ready to install laminate hardwood flooring feels a bit like preparing for a cooking show – you want all your ingredients and tools laid out before you start. The good news? You won’t need a garage full of expensive equipment to get professional-looking results.
Your essential tool kit starts with the basics: a reliable tape measure, pencil for marking, and those crucial 3/8-inch spacers that maintain your expansion gap. The tapping block and rubber mallet become your best friends for snug joint connections, while a pull bar saves the day when installing those tricky last planks against the wall.
For cutting, a miter saw or laminate cutter handles most straight cuts beautifully. You’ll also want a jigsaw for curves around vents and door jambs. Don’t forget the 4-foot level – your subfloor needs to be within 3/16″ over 10 feet, and this tool helps you check that. Round out your kit with a utility knife, safety glasses, and knee pads (your knees will thank you later).
Material planning requires some math, but it’s straightforward. Start with your laminate planks plus that crucial 10% waste allowance – trust me, you’ll use those extra pieces for cuts and future repairs. Most installations need underlayment unless your planks have it pre-attached. For concrete subfloors, a vapor barrier isn’t optional – it’s essential protection against moisture.
Don’t forget the finishing touches: transition strips where your new floor meets other surfaces, quarter-round molding to cover expansion gaps, and silicone caulk for sealing edges. Duct tape helps seam your underlayment rows together.
Average DIY costs vary widely based on your style choices. Basic laminate runs $2-4 per square foot, while mid-grade options cost $4-6 per square foot. Premium laminate with advanced wear layers and realistic textures ranges $6-15 per square foot. Luxury laminate with extra-thick planks and superior locking systems can reach $15-45+ per square foot.
Professional installation costs (based on internet data, not KT Flooring pricing) typically range from $6.62-11.33 per square foot for standard jobs. Complex installations with multiple rooms and tricky layouts can cost $12-35+ per square foot. These are average costs – we provide free in-home consultations to give you accurate estimates for your specific project.
For detailed comparisons of different flooring options, check out our Flooring Types page.
Choosing Underlayment & Moisture Barriers
Think of underlayment as the foundation of comfort beneath your beautiful new floor. It serves multiple purposes: sound reduction keeps your footsteps from echoing through the house, thermal insulation makes walking barefoot more comfortable, and moisture protection prevents subfloor dampness from reaching your planks.
Built-in underlayment comes pre-attached to your planks – convenient but sometimes thicker than you want. Foam roll underlayment provides basic cushioning and sound dampening at an affordable price. Cork underlayment offers superior sound reduction and thermal properties, perfect for upstairs installations. Rubber underlayment gives the best sound absorption, ideal if you live in an apartment or want maximum noise control.
Interesting research on underlay foam thermal conductivity shows that proper underlayment can actually reduce your heating energy costs.
Moisture barriers aren’t negotiable in certain situations. Always use them over concrete – even seemingly dry concrete can wick moisture that will ruin your floor. Basement installations require moisture barriers regardless of the subfloor type. High-humidity rooms like bathrooms and laundries need extra protection, and radiant heated floors require special thermal-rated barriers.
Budget Checklist
Smart budgeting starts with accurate square footage calculations. Measure your room’s length times width, then add 10% for waste and mistakes – this isn’t pessimism, it’s reality. Don’t forget closets and alcoves in your measurements, and consider buying a few extra planks for future repairs.
Tool rental costs run about $30-50 per day for specialty saws if you don’t want to buy them. Transition strips cost $15-40 each depending on length and style – you’ll need these where your laminate meets other flooring types. Budget $50-100 for trim and caulk in an average room.
If you’re removing old flooring yourself, factor in disposal fees of $100-300 depending on your local waste management rules. Subfloor repairs can add $2-5 per square foot if you find problems during preparation.
Money-saving strategies include shopping during sales events, considering builder-grade options for low-traffic areas, renting tools instead of buying, and reusing existing trim when it’s in good condition. Sometimes the best investment is knowing when to call professionals – we’re here when your project needs expert guidance.
Preparing the Subfloor & Room

Here’s where the magic really begins – and where many DIY projects succeed or fail. Think of subfloor preparation as building the foundation for your beautiful new floor. Skip this step, and you’ll hear every creak and see every imperfection for years to come.
The golden rule when you install laminate hardwood flooring is simple: your subfloor must be level within 3/16 inch over 10 feet. This isn’t just a suggestion – it’s the difference between a professional-looking result and a floor that feels like a funhouse. Use a long level to check, and mark any problem areas with chalk.
Start by removing everything from the room, including existing flooring, carpet tack strips, and any stubborn staples hiding in corners. I’ve seen too many installations ruined by one forgotten staple that punctures the underlayment. Take your time here – a thorough cleaning and vacuuming now saves headaches later.
Moisture testing is crucial, especially over concrete subfloors. Your concrete should test below 4.5% moisture content. Too high? Wait for it to dry or install a vapor barrier. Trust me, moisture problems only get worse with time, never better.
Acclimate your laminate planks for 48-72 hours in the installation room at normal living temperatures (65-85°F with 35-65% humidity). This isn’t busy work – it’s preventing your beautiful new floor from buckling or gapping later. Stack the boxes flat and open them to let air circulate.
Don’t forget to undercut your door jambs so planks can slide underneath for a clean, professional look. A simple handsaw and scrap piece of flooring as a guide makes this easy. It beats trying to cut perfect notches around every door frame.
For concrete installations, check out our detailed guide on Install Hardwood Floor on Concrete for specific preparation steps.
Safety should be your top priority: wear safety glasses when cutting, use dust masks during demolition, and test for asbestos in homes built before 1980. A few extra minutes of protection can save you from serious health issues down the road.
Subfloor Types
Plywood and OSB subfloors are the easiest to work with when you install laminate hardwood flooring. You’ll need at least 5/8 inch thickness over 16-inch joist spacing. Walk around and listen for squeaks – those loose boards need screws to secure them properly. Fill any gaps or holes with wood filler, and sand down high spots to create that perfectly level surface.
Concrete subfloors require more attention but work beautifully once prepared. Always perform a moisture test first – this isn’t optional. Fill cracks and holes with concrete crack filler, and grind down any high spots. The most important step? Install a vapor barrier over concrete every single time. Moisture will find a way through concrete, and your laminate will pay the price if you skip this protection.
Existing hardwood can work as a base, but only if it’s structurally sound. No loose boards, no major damage, and no squeaks that drive you crazy. Clean it thoroughly, fill gaps, sand high spots, and install a moisture barrier to protect your new floor from any moisture in the old wood. Sometimes refinishing the existing hardwood makes more sense than covering it – we can help you decide during a consultation.
Existing tile presents unique challenges but isn’t impossible. Remove any loose tiles first – even slightly loose ones will telegraph movement through your new laminate. Fill large grout joints with leveling compound to create a smooth surface, and clean thoroughly to remove all dirt, grease, and residue. Check carefully for lippage where tiles are uneven, as this will show through your finished floor.
Room Layout Planning
Choose your starter wall wisely – this decision affects how your entire floor looks. The longest, straightest wall usually works best, especially if it’s the most visible when you enter the room. Starting away from the main entrance lets you hide any cut pieces at the far end where they’re less noticeable.
Plank direction matters more than you might think. Run planks parallel to your main light source to minimize seam visibility, or follow the room’s longest dimension to create a more spacious feeling. If you’re continuing from adjacent rooms, maintain that visual flow for a cohesive look throughout your home.
Plan your cuts before making the first one. Calculate your first and last rows to avoid ending up with thin slivers that look unprofessional. Any piece shorter than 12 inches looks awkward and may not lock properly. Stagger your seams by at least 6 inches between rows – some pros recommend 12 inches for the most natural appearance.
Create a simple cutting diagram to use your materials efficiently. This planning prevents waste and ensures you have enough material to complete the job. You ordered 10% extra, but smart planning means you might not need it all.
How to Install Laminate Hardwood Flooring Step-by-Step
This is where the magic happens – actually installing laminate hardwood flooring! After all that planning and prep work, you’ll be amazed at how quickly the planks come together with the click-lock system.
The beauty of laminate installation lies in its forgiving nature. Unlike traditional hardwood that gets nailed down permanently, you can actually take apart sections if you make a mistake. This floating floor system gives DIYers the confidence to tackle what looks like a professional job.
Your installation follows a logical sequence: acclimate your planks for 48-72 hours, roll out the underlayment with careful seaming, place spacers for that crucial 3/8-inch expansion gap, then start your first row with the tongue facing the wall. Each subsequent row builds on the last, with proper staggering of seams by at least 6 inches to avoid weak spots.
The click-lock tongue-and-groove system is surprisingly satisfying to work with. You’ll hear a distinct “click” when planks lock together properly. When you reach the final row, a pull bar becomes your best friend for snugging that last plank into place.
Don’t forget about obstacles like heating vents and door jambs – these require careful measuring and cutting, but they’re not as intimidating as they look. The key is taking your time with measurements and using the right tools for clean cuts.
Acclimation & Layout for Install Laminate Hardwood Flooring
Your planks need time to adjust to your home’s environment before you install laminate hardwood flooring. Think of acclimation like letting a cold pizza warm up to room temperature – rushing the process leads to problems later.
Keep your room between 65-85°F with 35-65% humidity during the entire acclimation period. This isn’t just manufacturer fussiness – laminate expands and contracts with temperature and humidity changes. Skipping this step can lead to gaps or buckling after installation.
Store the unopened boxes flat in your installation room for 48-72 hours minimum. This gives the fiberboard core time to reach equilibrium with your home’s conditions. While you wait, use this time for final layout planning.
Snap chalk lines along your starter wall to ensure you’re working with a straight reference line. Most walls aren’t perfectly straight, so don’t assume you can just follow the baseboard. Dry-fit your first few rows without locking them together – this lets you see how the pattern will look and make adjustments.
Mix planks from different boxes as you work. This creates natural color variation that mimics real hardwood. Calculate your end cuts carefully so you don’t end up with a sliver less than 12 inches wide in your final row.
Installing the First Rows of Install Laminate Hardwood Flooring
Your first row sets the tone for the entire floor, so take extra care here. Remove the tongue from the wall side of your first row planks using a table saw or circular saw. This creates a clean, straight edge that sits against your spacers.
Place 3/8-inch spacers every 12-16 inches along the wall. These maintain your expansion gap – that crucial breathing room that prevents buckling when the floor expands. Start in the left corner and work your way across the room.
The locking technique takes a little practice but becomes second nature quickly. Angle each plank 20-30 degrees and insert the tongue into the previous plank’s groove. Lower the plank flat while maintaining forward pressure – you’ll hear and feel it click into place.
Use your tapping block on the cut ends only – never hit the tongue or groove directly. A few gentle taps ensure tight seams between planks. If you’re having trouble getting planks to lock, check that you’re maintaining the proper angle during insertion.
When you reach the end of each row, measure the remaining space carefully, accounting for your expansion gap. Cut your end piece with a fine-tooth blade to prevent chipping. Here’s a pro tip: if your cutoff piece is longer than 12 inches, save it to start your next row – this reduces waste and maintains proper staggering.
Weight down your completed rows with full cartons of planks. This prevents shifting while you work on subsequent rows and helps maintain tight seams.
Finishing Rows & Handling Obstacles
Door jambs require some finesse but aren’t as scary as they look. Undercut the jambs with a jamb saw so your planks can slide underneath for a clean, professional appearance. Test your cuts with a scrap piece to ensure proper clearance.
Heating vents need careful template work. Create a cardboard template by tracing the vent outline, then transfer this to your plank. Mark about 1cm oversize to account for the expansion gap around the vent. Drill starter holes at the corners, then use a jigsaw with a fine-tooth blade for smooth cuts.
The expansion gap around your room’s perimeter needs proper sealing to look finished and prevent moisture infiltration. Install foam backer rod in the gap first – this compressible foam provides a base for your sealant. Apply silicone caulk over the backer rod and tool it smooth before it cures.
Transition strips handle the connection between your new laminate and adjacent flooring. These come in various profiles for different height differences and room transitions. Measure carefully and pre-drill if needed to prevent splitting. Use appropriate fasteners – screws for concrete subfloors, finish nails for wood.
Stair noses provide a finished edge where your laminate meets stairs. These typically attach with both adhesive and mechanical fasteners for security. The key is getting the overhang measurement right – usually 3/4 to 1 inch beyond the riser.
Finishing Touches, Common Mistakes & Maintenance
Congratulations! You’ve successfully learned how to install laminate hardwood flooring. Now comes the satisfying part – adding those final touches that transform your project from “almost done” to “absolutely stunning.”
Removing spacers is your first step, and it’s surprisingly easy to miss one tucked behind a heating vent or in a corner. Take your time checking every wall carefully. Those little plastic spacers have done their job maintaining your crucial 3/8-inch expansion gap.
Next comes installing quarter-round molding to cover that expansion gap. This trim piece sits at the base of your walls, creating a clean finished look while allowing your floor to expand and contract naturally. Pre-drill nail holes to prevent splitting, and remember to nail into the baseboard, not the flooring itself.
Caulking the perimeter with paintable silicone creates a professional appearance while sealing against moisture. Run a thin bead along the quarter-round where it meets the baseboard, then tool it smooth with your finger for a clean finish.
The most common mistakes happen when DIYers get excited and rush these final steps. Creating “H” joints – where seams align in adjacent rows – is a dead giveaway of amateur installation. Skipping the vapor barrier over concrete subfloors leads to moisture problems months later. Forgetting acclimation causes boards to expand or contract after installation, creating gaps or buckling.
One installer shared this wisdom: “The biggest mistake is dragging furniture back into the room without protection.” Those beautiful new planks scratch easily until you install furniture pads under every leg.
Daily maintenance keeps your investment looking great for years. A simple sweep or vacuum removes the grit that causes micro-scratches. Weekly damp mopping with pH-neutral cleaners maintains the shine without damaging the wear layer. Avoid harsh chemicals, steam mops, or excessive water.
Pet accidents require immediate attention. Even waterproof laminate can fail if moisture seeps into seams and sits for hours. Most manufacturers include scratch repair kits with their flooring, perfect for minor damage from pet claws or dropped objects.
The beauty of laminate’s floating system means individual planks can be replaced if severely damaged. It’s like having a renewable floor – something you can’t say about traditional hardwood.
For professional installation and ongoing support, check out our Residential Flooring Installation services. We’re here to help whether you’re tackling this project yourself or want the peace of mind that comes with professional installation.
DIY vs. Hiring a Pro & Average Costs
Deciding whether to install laminate hardwood flooring yourself or hire professionals often comes down to three factors: your skill level, available time, and project complexity. Let me walk you through what to expect from both approaches.
Time expectations for DIY installation typically include 2-3 days for acclimation, 4-8 hours of preparation work, 1-2 days for the actual installation, and another 2-4 hours for finishing touches. That’s a solid weekend project for most homeowners, assuming everything goes smoothly.
DIY makes perfect sense when you’re working with simple rectangular rooms that require minimal cutting. If your subfloor is in good condition and you’re only dealing with basic obstacles like standard vents and doorways, you’ll likely find the process rewarding and straightforward. Plus, there’s something deeply satisfying about stepping back and admiring a floor you installed with your own hands.
However, calling in professionals becomes wise when you’re facing complex room layouts with multiple angles and challenging obstacles. If your subfloor needs major leveling or structural repairs, that’s definitely pro territory. Time constraints matter too – when you need the job done quickly for a house sale or family event, experienced installers can complete in hours what might take you days.
Professional labor costs vary significantly based on complexity and location. According to internet data (not KT Flooring pricing), basic installation averages $3-6 per square foot, while complex installations run $6-12 per square foot. Premium services can reach $12-25+ per square foot for intricate layouts or high-end materials.
Additional services add to the total investment. Old flooring removal typically costs $1-3 per square foot, subfloor preparation runs $2-5 per square foot, and disposal fees range from $100-500 depending on materials. Some companies charge $50-200 per room for furniture moving, though many homeowners handle this themselves.
The hidden complexities often surprise DIYers. What looks like a simple rectangle might have walls that aren’t square, subfloors with unexpected dips, or plumbing obstacles that require creative solutions. Professional installers have seen it all and carry specialized tools that can save hours of frustration.
Warranty protection represents another key consideration. Many manufacturers require professional installation to maintain warranty coverage, especially on premium products. When you’re investing in expensive materials, that protection becomes valuable insurance.
At KT Flooring, we’ve guided countless homeowners through this decision over our 50+ years serving New Hampshire and Northeast Massachusetts. Sometimes we recommend DIY for straightforward projects, other times we suggest professional installation to protect your investment and ensure perfect results.
Our free in-home consultations help you make this decision with confidence. We’ll assess your specific situation, explain any challenges we spot, and give you honest advice about whether DIY makes sense for your project.
For more information about our professional services, check out our Professional Flooring Installation MA page.
Frequently Asked Questions about Laminate Floor Installation
What expansion gap do I really need?
You absolutely need a 3/8-inch expansion gap around all walls and fixed objects like cabinets, islands, and door frames. This isn’t just a suggestion – it’s critical for preventing expensive floor failures.
Here’s why this gap matters so much: laminate flooring is like a living thing that expands and contracts with your home’s temperature and humidity changes. Without proper room to move, your beautiful new floor can buckle up like a mountain range or develop unsightly gaps between planks.
Seasonal behavior is completely normal. Don’t panic if your gaps look larger in winter when the air is dry, or smaller in summer when humidity rises. This is exactly what the expansion gap is designed to handle.
The good news? You’ll never see these gaps once you’re done. Quarter-round molding, baseboards, and transition strips cover the expansion space while still allowing your floor to breathe and move freely.
Can I install laminate over existing tile or hardwood?
Yes, you can install laminate hardwood flooring over both tile and existing hardwood, but there are important conditions to meet first.
Over existing tile works great if the tile is well-bonded to the subfloor, reasonably level, and thoroughly clean. You’ll need to fill any large grout joints with leveling compound and make sure no tiles are loose or cracked. Think of it as building on a solid foundation – wobbly tiles will create wobbly laminate.
Over existing hardwood is also possible, provided the old floor is structurally sound, level, and completely dry. Always install a moisture barrier between the old wood and new laminate to prevent moisture issues from the existing floor.
The biggest consideration is height changes. Adding laminate increases your floor height by 8-12mm plus underlayment thickness. This affects door clearances, appliance fit, and transitions to other rooms. Sometimes the cost and hassle of dealing with height differences makes removing the old floor more practical.
How do I handle transitions between different floor heights?
Transition strips are your best friends when dealing with height differences between rooms or flooring types. The key is choosing the right strip for your specific situation.
T-molding works perfectly when both floors are the same height – like transitioning from your new laminate to existing laminate in an adjacent room. Reducer strips handle height differences up to half an inch, which covers most situations when transitioning to tile or hardwood.
For doorways, threshold strips create clean transitions while stair nosing handles step edges safely and attractively.
Installation requires careful measuring of height differences and pre-drilling to prevent splitting. Use the right fasteners for your subfloor type – screws for concrete, nails for wood subfloors. Always maintain proper expansion gaps on both sides of the transition.
Caulk the edges where the transition meets walls or door frames for moisture protection and a finished appearance. This small detail makes the difference between a professional-looking job and an obvious DIY project.
Conclusion
Installing laminate hardwood flooring is one of those weekend projects that delivers instant gratification and lasting satisfaction. You’ll walk into your transformed space Monday morning with a real sense of accomplishment – and probably some well-earned sore knees!
The beauty of laminate lies in its forgiving nature. Unlike traditional hardwood installation that requires years of experience, the click-lock system lets you learn as you go. Proper acclimation sets you up for success from day one, while level subfloor preparation ensures your beautiful new floor won’t develop squeaks or gaps down the road.
Remember those expansion gaps we talked about? They might seem like a nuisance during installation, but they’re what keep your floor stable through New England’s dramatic seasonal changes. Proper staggering not only creates visual appeal but also gives your floor the structural integrity to handle everything from holiday gatherings to muddy boots.
Quality underlayment makes the difference between a floor that sounds hollow and one that feels solid and comfortable underfoot. It’s one of those details that separates a good DIY job from a professional-quality installation.
At KT Flooring, we’ve been cheering on DIY enthusiasts across New Hampshire and Northeast Massachusetts for over 50 years. From our Hudson location, we’ve seen homeowners tackle everything from simple bedroom installations to complex whole-house projects. Some sail through without a hitch, while others call us halfway through when they realize their “simple” project has some unexpected challenges.
That’s exactly why we offer free in-home consultations. Whether you’re planning to install laminate hardwood flooring yourself or thinking about professional installation, we can assess your specific situation and help you make the best choice. Sometimes a quick conversation saves hours of frustration and costly mistakes.
Our decades of experience mean we understand both the excitement and the reality of flooring projects. We’re here to provide expert guidance when you need it, quality materials that perform as promised, and professional backup when projects get more complex than expected.
Ready to transform your space? Contact us for your free consultation, or explore our complete Hardwood Flooring options to find what’s possible for your home.
The best laminate installation combines the right preparation, quality materials, and knowing when to ask for help. That’s the formula we’ve been perfecting with New England homeowners for over five decades – and we’d love to help make your flooring dreams a reality.
