Transform Your Staircase: Why Stair Carpet Fitting Matters
Stair carpet fitting is the process of installing carpet on a staircase to improve safety, reduce noise, and add style to your home. For those looking for quick guidance:
| Stair Carpet Fitting | Key Information |
|---|---|
| DIY Difficulty | Moderate (2-4 hours for straight stairs) |
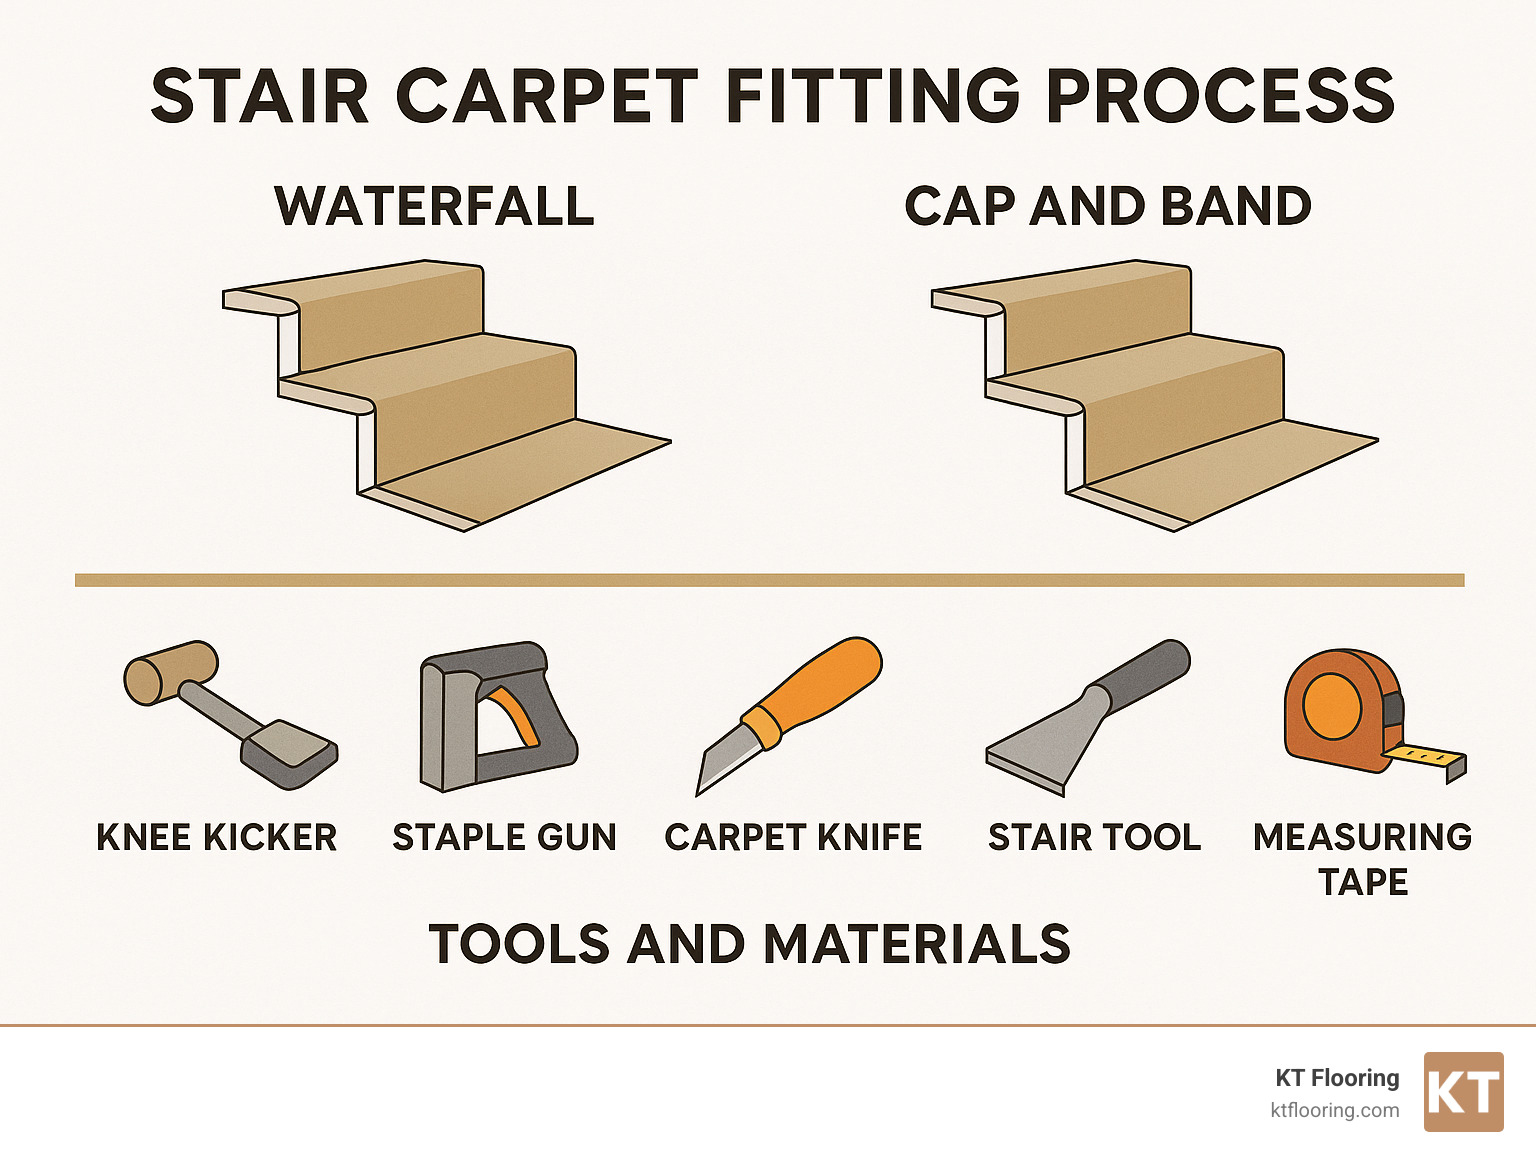
| Main Methods | Waterfall (simpler) or Cap & Band (more polished) |
| Basic Tools Needed | Knee kicker, staple gun, carpet knife, stair tool, measuring tape |
| Average Cost | $200-600 for materials, $300-900 for professional installation |
| Safety Benefits | Reduces slip hazards and cushions falls |
A carpeted staircase does more than just look good—it creates a safer home environment by providing traction and cushioning potential falls. Stair carpet fitting also significantly reduces noise from foot traffic, making those midnight trips to the kitchen much less disruptive for the entire household.
When done properly, stair carpet installation can transform one of the most visible and frequently used areas of your home. The process requires careful measurement, proper tools, and attention to detail, but the results are worth the effort.
My name is Christopher Talty, owner of KT Flooring with over 45 years of experience in stair carpet fitting and flooring installation throughout New Hampshire and Northeast Massachusetts. I’ve personally overseen hundreds of staircase changes and trained our team to deliver exceptional results on even the most challenging staircases.
Essential stair carpet fitting terms:
– commercial carpet installation
– install carpet
– flooring company
Choosing the Right Carpet & Underlay for Stairs
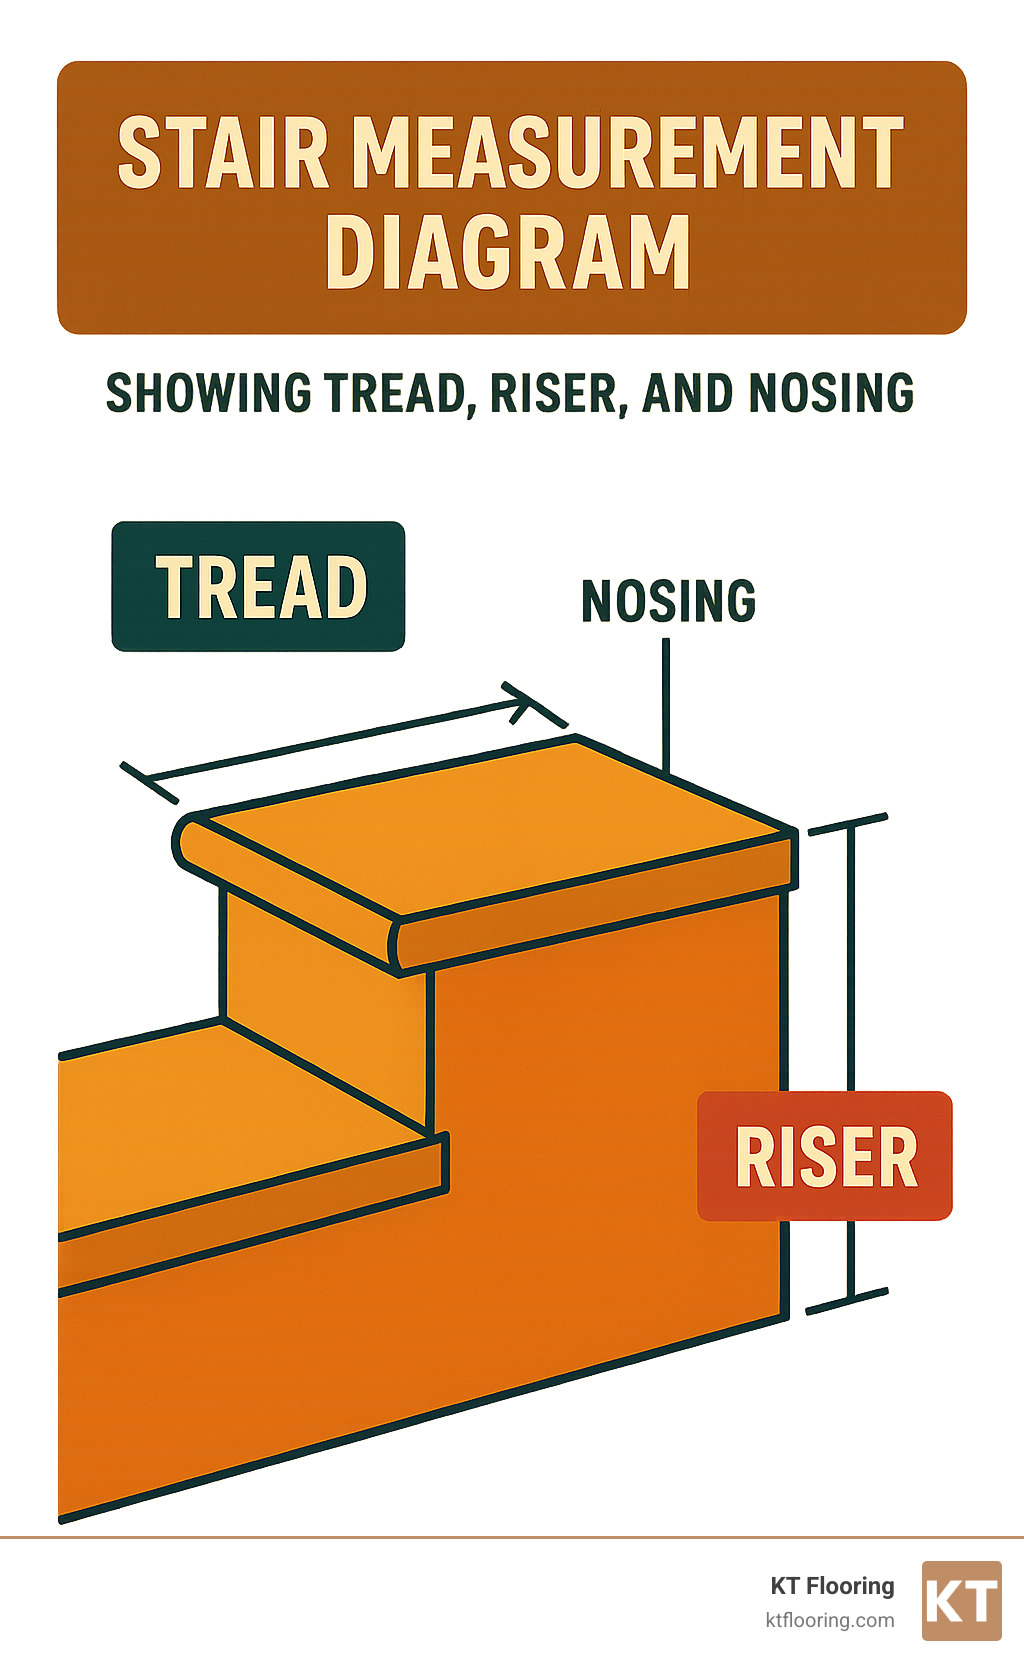
When it comes to changing your staircase, selecting the perfect carpet isn’t just about looks—it’s about finding something that can handle the daily parade of feet while still looking gorgeous years later. Your stairs take quite a beating, with the nosing (that front edge) getting the brunt of the wear and tear.
Best Carpet Materials for Stairs
Not all carpets are created equal when it comes to stair carpet fitting. After decades of installations, we’ve found these materials stand the test of time:
Nylon shines as the superstar of stair carpets. It’s like that friend who always bounces back after a tough day—these fibers spring back to shape even after heavy traffic, preventing that sad, flattened-path look that can make your stairs look tired and worn.
Wool offers that touch of luxury with incredible durability. If you’re looking to treat your stairs (and your feet) to something special, hard-twist wool carpets provide both elegance and resilience. Yes, they cost more upfront, but they’re the marathon runners of the carpet world.
Polyester works well for families with small children or pets prone to accidents. While not quite as durable as nylon, its stain-resistance is impressive, and it holds onto vibrant colors beautifully over time.
Berber loops with their distinctive knotted appearance hold up remarkably well on stairs—just be cautious if you have cats or dogs whose claws might snag in the loops. Nothing ruins a peaceful morning quite like a panicked pet attached to your staircase!
Pile Height and Density
When it comes to stairs, shorter is safer! Low-pile carpets (under ½ inch) provide better traction and reduce tripping hazards. Think of it this way—your stairs aren’t the place to sink your toes into ultra-plush carpet.
Density matters even more than softness here. A dense, tightly-constructed carpet resists crushing and maintains its appearance longer, even at pressure points. And here’s a pro tip we share with our customers: textured or patterned carpets hide wear patterns and footprints much better than solid colors, especially in high-traffic areas.
Runner vs. Full-Width Carpet
The great debate in stair carpet fitting often comes down to full coverage versus runners:
Full-width carpet wraps your stairs in complete comfort, creating a seamless look that maximizes safety and muffles those midnight snack expeditions. This approach works beautifully when you want to match your stair carpet to adjoining rooms for a cohesive feel throughout your home.
Stair runners add character while leaving wood or painted edges visible on either side. They’re like the stylish scarves of the carpet world—adding personality while letting your staircase architecture shine through. Runners can be more budget-friendly, easier to replace when worn, and offer a wonderful opportunity to introduce bold patterns that might be overwhelming in full-width applications.

Choosing the Right Underlay
The unsung hero of any successful stair carpet fitting is quality underlay. It’s like the foundation of a house—invisible but absolutely essential:
High-density foam underlay (minimum 8mm) provides the perfect balance of cushioning without excessive give. Your stairs should feel comfortable but not spongy—safety always comes first.
Felt and rubber combinations offer exceptional durability at pressure points, particularly at the stair nosing where wear is most concentrated.
Building codes often specify maximum combined carpet and underlay thickness to ensure stair nosings remain clearly defined. This isn’t just bureaucratic red tape—it’s about keeping your family safe by maintaining the visibility of each step’s edge.
As our installation team often tells clients: “A good quality underlay will prolong the life of your carpet by protecting it from excessive wear on the tread and, particularly, over the nose of the tread.” It’s one area where cutting corners truly costs more in the long run.
Ready to explore your options? We’ve been helping New Hampshire and Massachusetts homeowners choose the perfect stair carpets for over 50 years.
More info about Carpet Flooring
Must-Have Tools, Safety Gear & Precise Measurement
Ready to tackle stair carpet fitting? Having the right tools doesn’t just make the job easier—it’s the difference between a professional-looking installation and one that screams “amateur hour.” Let’s get you properly equipped for success!
Essential Tools for Stair Carpet Installation
Nothing beats the satisfaction of having exactly the right tool for the job. For stair carpet fitting, you’ll want to gather these essentials before you start:
The Roberts Knee Kicker is your best friend during this project—it’s the industry standard for a reason. This handy tool lets you stretch carpet with just the right tension, eliminating those unsightly wrinkles that can make your stairs look sloppy. Think of it as your carpet’s personal trainer, helping it get nice and taut!
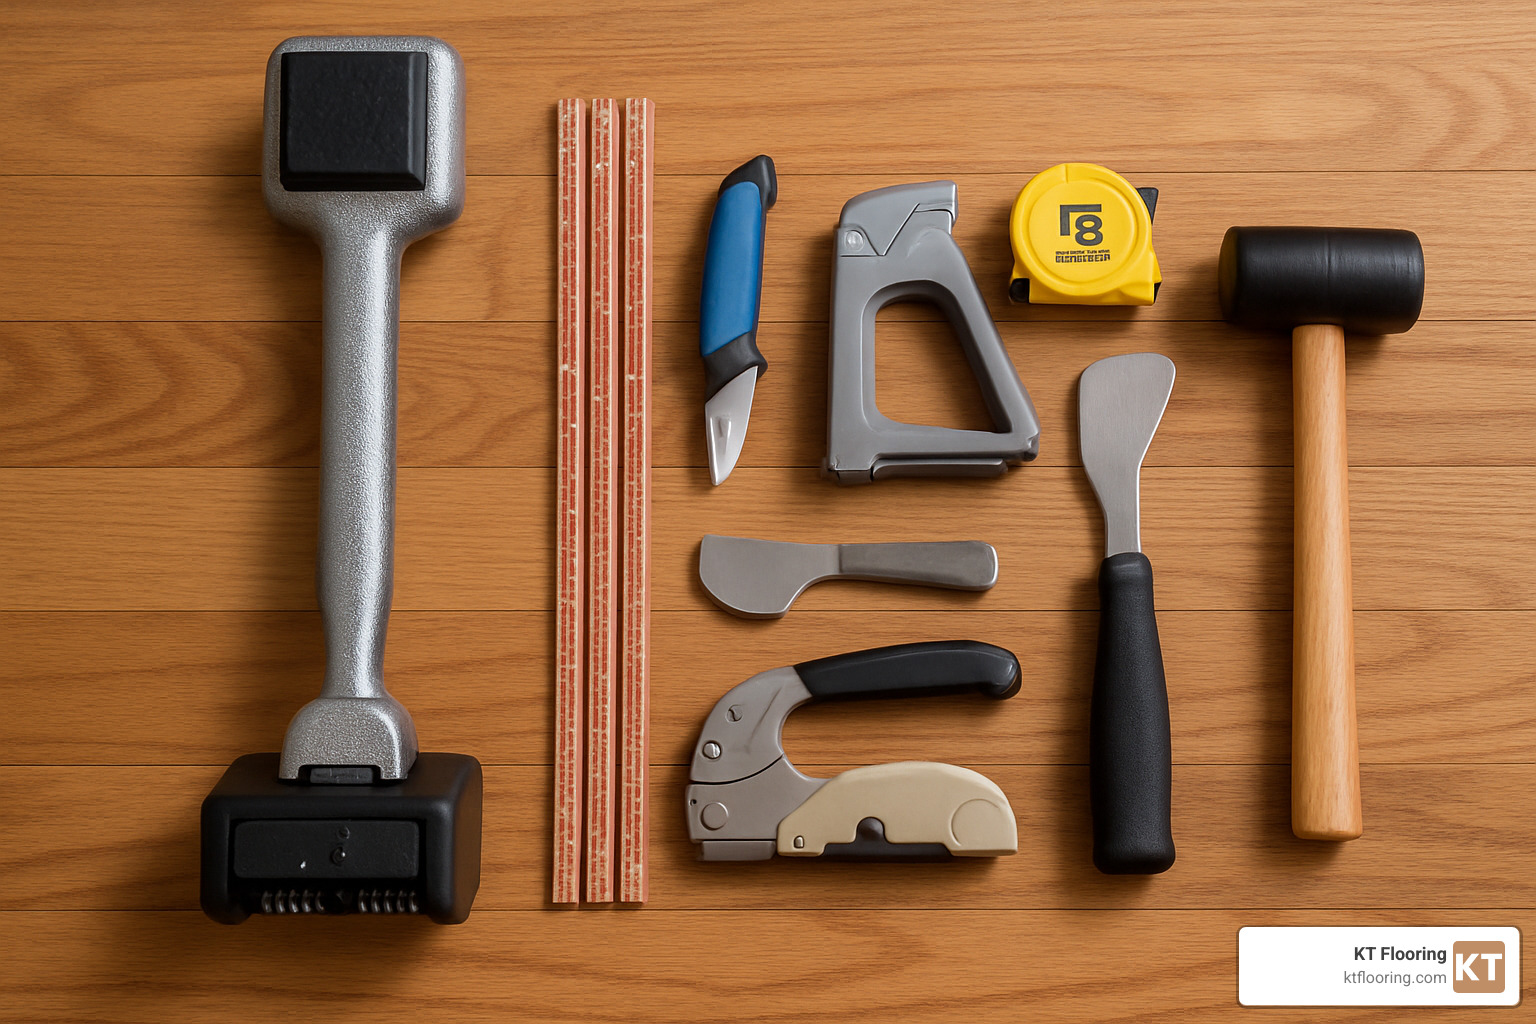
You’ll also need a good staple gun—electric ones save your hands on bigger projects, but a hammer stapler works fine for smaller jobs. Pair this with sharp carpet shears or a knife (the “Bloody Mary” double-edged carpet knife lets you use both sides before changing blades—economical and efficient!).
The specialized stair tool might look simple, but it’s invaluable for tucking carpet into corners and creating those crisp, professional creases where treads meet risers. Round out your toolkit with a tape measure, chalk line, hammer, tack strips (also called gripper rods), a carpet pad cutter, and a rubber mallet for gentle adjustments that won’t damage those precious carpet fibers.
Check out the Pricing for Roberts Knee Kicker Here
Safety Equipment
Your knees and hands will thank you for thinking ahead about safety during stair carpet fitting. Trust me, I’ve learned this lesson the hard way over decades of installations!
Knee pads aren’t just nice to have—they’re essential when you’re spending hours kneeling on hard surfaces. Good work gloves protect your hands from those surprisingly sharp tack strips (which seem designed to find any unprotected skin). Don’t forget eye protection when you’re cutting materials or using the staple gun, and a dust mask is your friend when removing old carpet that’s been collecting dust for years.
Precise Measurement Techniques
The old carpenter’s adage “measure twice, cut once” might as well have been created for stair carpet fitting. Careful measurement is the foundation of a successful installation, especially since carpet isn’t cheap!
Start by measuring each stair individually—even in newer homes, stairs can vary slightly, and these small differences add up. Record the tread depth (typically 10-11½ inches from back to nosing edge) and riser height (usually no more than 7¾ inches per building codes).
To calculate your total runner length for a standard staircase with 13 treads and 14 risers, use this simple formula:
(Riser Height × Number of Risers) + (Tread Depth × Number of Treads) + 6 inches waste
For example: (7.5 × 14) + (11.5 × 13) + 6 = 261.5 inches = 21.79 feet (round up to 22 feet)
If your chosen carpet has a pattern, add an extra 12 inches when planning seams—this gives you wiggle room for pattern matching. And for those tricky curved or winding staircases, save yourself headaches by creating paper or cardboard templates for each step.
Proper measurement isn’t just about avoiding waste—it’s about ensuring your stairs meet safety codes while looking fantastic. Building codes specify maximum combined carpet and underlay thickness to keep those nosings clearly defined, preventing trips and falls.
Pro Tip: Double-check your measurements before making any cuts. The few extra minutes spent verifying could save you hundreds in wasted carpet!
Step-by-Step Stair Carpet Fitting Methods
Now that you’ve selected the right carpet and gathered your tools, let’s dive into the actual stair carpet fitting process. I’ve installed hundreds of stair carpets over the years, and I’ll walk you through both major methods with the tips I wish someone had shared with me when I started.
Preparation
Before you touch a single tool, proper preparation will save you hours of frustration. Start by removing all existing flooring completely—carpet, padding, staples, tacks—everything needs to go. Then give those stairs a thorough vacuum to eliminate any debris that could create bumps under your new carpet.
Take a moment to inspect each stair for loose treads or protruding nails. These small issues become big headaches if finded mid-installation. Your new carpet should also spend 24-48 hours in your home before installation to adjust to your home’s humidity and temperature.
One crucial detail many DIYers miss: determine which way the carpet pile naturally lays by running your hand across it. For stairs, you want the pile running DOWN the stairs—this catches less dirt and maintains its appearance much longer.
Installing Tackless Strips and Underlay
The foundation of a professional stair carpet fitting is properly installed tackless strips and underlay. Cut your tackless strips about 2 inches shorter than your carpet width (1 inch shorter on each side). This prevents the sharp pins from poking through at the edges.
Position strips on each riser about 1/4 inch up from the tread, with pins facing upward toward the ceiling. Then place strips on each tread about 1/4 inch from the riser, with pins facing toward the riser. These create the anchor points that hold your carpet firmly in place.
For the underlay, cut pieces slightly narrower than your carpet width. Staple them securely to each tread, keeping them snug against the tackless strip without overlapping it. For maximum durability, shape the underlay over the nose of each tread like an envelope flap, which provides extra cushioning at this high-wear area.
“A good quality underlay will prolong the life of your runner by protecting it from excessive wear on the tread and, particularly, over the nose of the tread,” our installation experts often remind clients.
Waterfall Stair Carpet Fitting
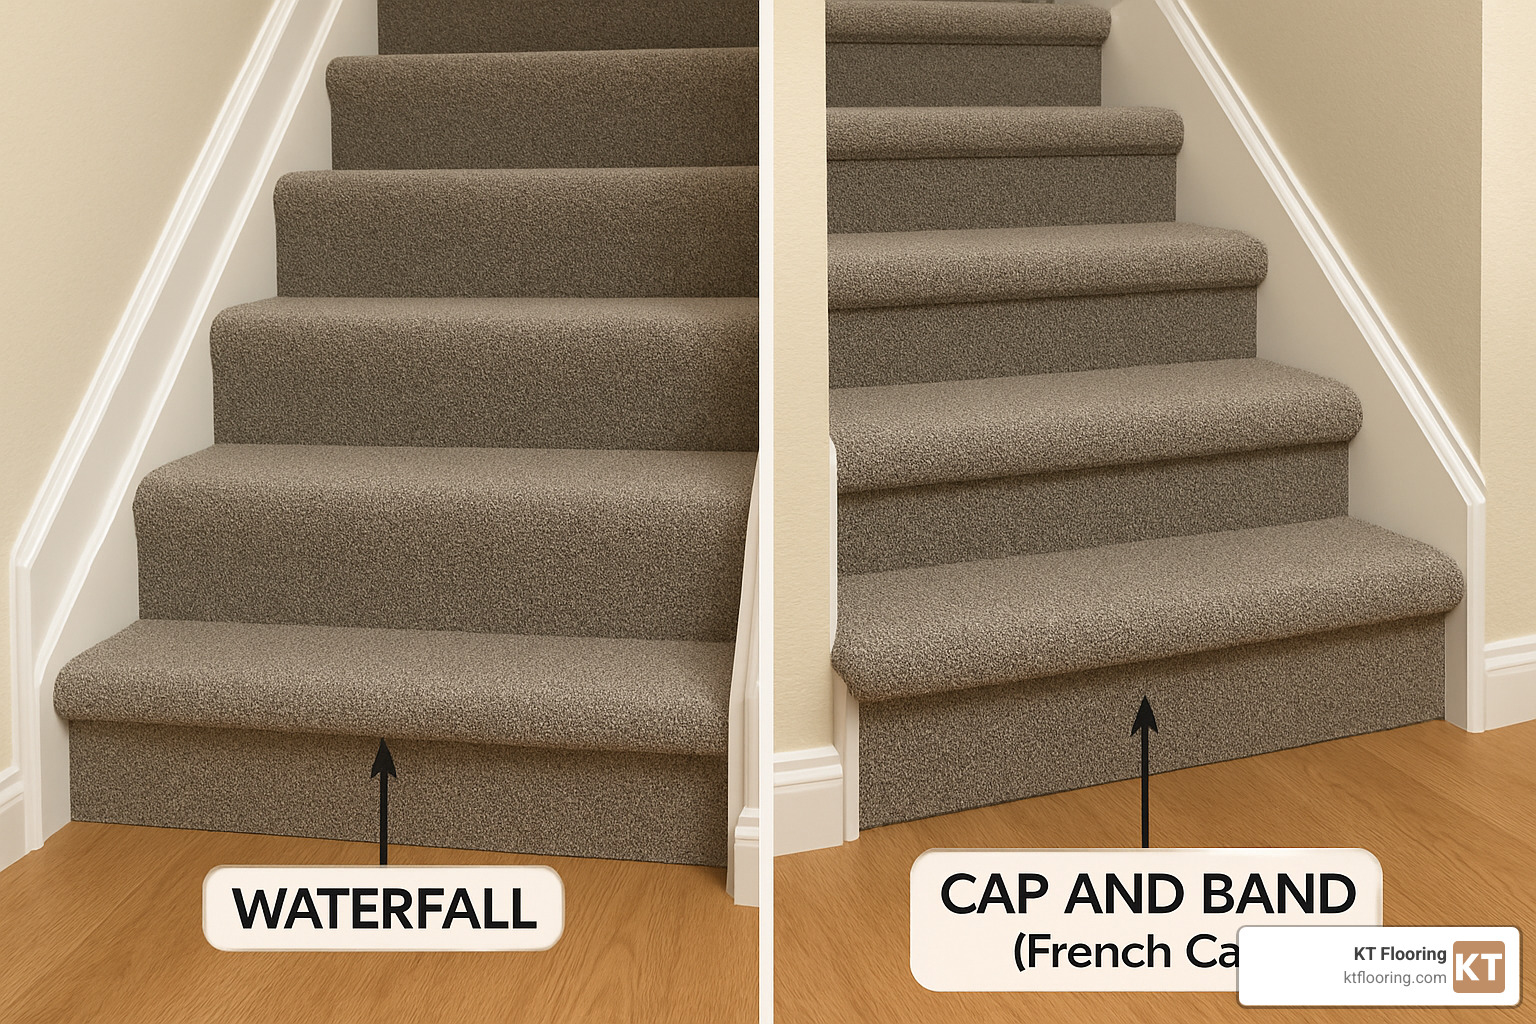
The waterfall method gets its name from how the carpet “falls” straight down from tread to riser without wrapping around the nosing. Think of it as a waterfall cascading down your staircase.
This approach is perfect if you’re new to stair carpet fitting or working alone. It’s faster, uses less carpet, and requires fewer precise cuts than the alternative method.
Starting at the bottom stair, center your carpet with equal spacing on both sides. Secure it to the bottom riser with staples, ensuring it’s perfectly straight—this sets the alignment for your entire staircase. Work your way up, pulling the carpet over each tread and down to the next riser in one continuous piece.
As you go, use your knee kicker to eliminate wrinkles and create tension before stapling. Place staples where they’ll be hidden by the carpet pile by wiggling the tacker between the nap. This creates a clean, professional look without visible fasteners.
The waterfall method works beautifully for most residential staircases and creates a smooth, flowing appearance that many homeowners prefer.
Cap & Band Stair Carpet Fitting
Also known as the French Cap method, this technique wraps the carpet around the nosing of each tread for a more custom, custom look. While it requires more precision and patience, the results are worth the extra effort.
The cap and band approach offers superior durability at the nosing—the area that takes the most abuse from foot traffic. It also creates a more defined stair edge, which some people find both more attractive and safer to steer.
Begin at the bottom stair and work upward, attaching carpet to the bottom riser using double-sided tape or adhesive before stapling. Drape the carpet over the tread, wrapping it tightly around the nosing. Use your knee kicker to stretch the carpet toward the next riser, eliminating any wrinkles or bubbles.
The magic happens when you use your stair tool to create tight, clean seams at the junction between tread and riser. This crisp fold gives cap and band installations their distinctive, professional appearance. A gentle tap with a rubber mallet helps set these creases perfectly.
Quality Check Tips
After you’ve finished your stair carpet fitting, take a moment to run through this quick quality check:
Is the carpet tight with no wrinkles or bubbles? Run your hand over each step to feel for any imperfections. Check that pattern alignment is consistent if you’re using patterned carpet. Examine all edges to ensure they’re neatly trimmed and secured. Look carefully for any visible staples or tack strips that need to be hidden. Confirm the carpet pile runs in the correct direction throughout. And finally, make sure all nosings are clearly defined for safety.
Stair carpet fitting is as much art as science. Take your time, particularly on the first few stairs, to establish a consistent technique. The staircases I’m most proud of installing are the ones where I slowed down and focused on precision from the very first step.
With practice and patience, you’ll develop the confidence to create a beautifully carpeted staircase that improves your home’s safety, appearance, and value for years to come.
Advanced Scenarios & Troubleshooting
Let’s face it – not every staircase is a simple, straight shot from one floor to another. That’s where the real art of stair carpet fitting comes into play. After fitting hundreds of staircases over the years, I’ve learned that these tricky situations are where experience truly shines.
Pattern Matching Techniques
Working with patterned carpet is like solving a puzzle where every piece needs to line up just right. The key is centering your pattern on each stair for that balanced, professional look. Always budget at least 20% extra material when using patterned carpet – you’ll thank yourself later!
Start your installation at the most visible point (typically the bottom stair) and pay special attention to alignment at eye level. That’s where everyone’s gaze naturally falls, and where mismatches become glaringly obvious.
Here’s a pro tip from years on the job: smaller patterns forgive minor alignment issues much better than bold, large designs. If you’re DIYing and worried about pattern matching, consider a carpet with a subtle, smaller repeat pattern.
Handling Turns & Landings
Template Every Step
When facing curved or winding stairs, patience becomes your best friend. I always create a custom template for each individual step using heavy cardboard. This might seem time-consuming, but it’s actually a time-saver in disguise – you’ll waste less expensive carpet and achieve a much cleaner result.
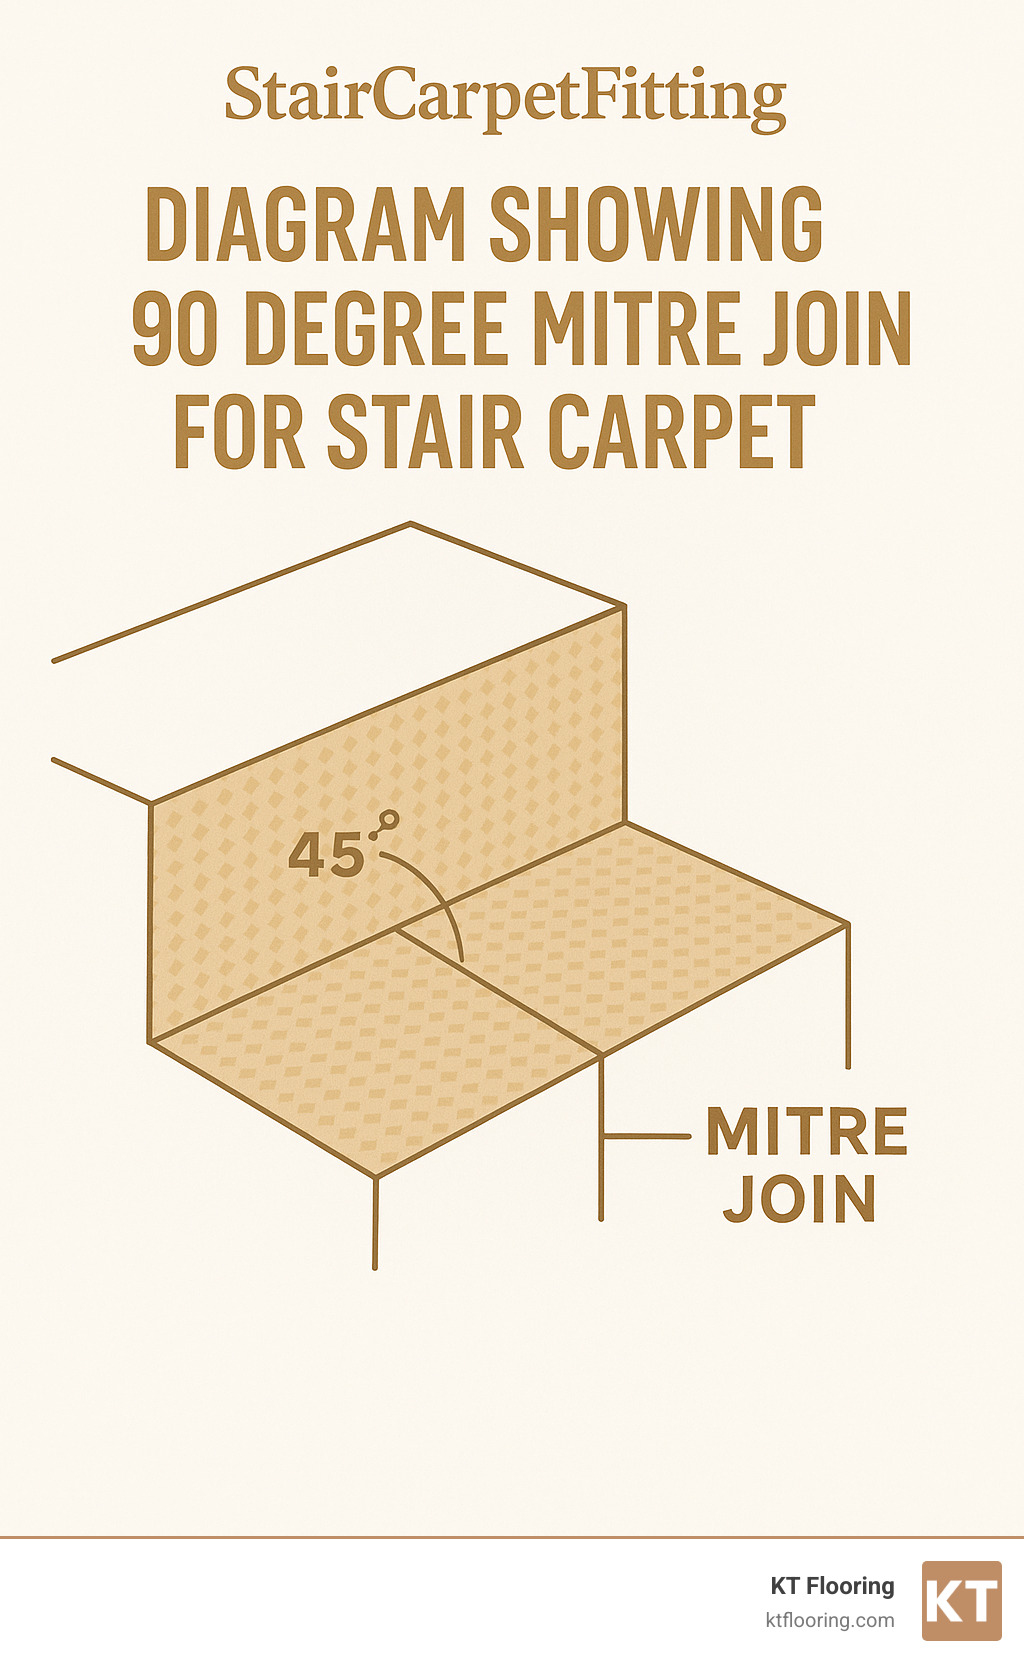
Mitre Joins for 90° Turns
When your staircase makes that 90° turn, proper mitering creates a seamless transition:
- Cut each carpet piece at a precise 45° angle
- Join these mitered edges using quality seaming tape or a hot glue gun
- Double-check your pattern alignment across the join before securing
T-Joins for Landings
Landing transitions require special attention:
“For winding stairs or those with a half landing and turn, we strongly recommend that you employ the services of a professional fitter,” our team advises after over 50 years of tackling these challenging installations.
Venetian Finish for Non-Standard Angles
Some staircases refuse to follow conventional angles, and that’s when a Venetian finish comes to the rescue. By cutting and joining carpet pieces at 90° to both riser faces, you create a mirrored pattern throughout the run. While these joins remain visible, they look intentional and professional when executed correctly – more like a design feature than a compromise.
Fixing Visible Gaps
Nothing undermines an otherwise beautiful stair carpet fitting job like visible gaps between the carpet and wall. If you spot this issue:
First, check your initial tension – sometimes a simple re-stretch during installation solves the problem. Make sure your carpet width properly spans the area without buckling. You’ll need to decide whether to tuck the edge (for a snug fit but with potential curl) or leave it flat (better appearance but possible visible gap).
For stubborn gaps, a little piping rope jammed between the carpet edge and stringer works wonders. It’s an old-school trick that still delivers results.
Decorative Stair Rods
While no longer necessary for securing carpet, decorative stair rods add that touch of elegance that lifts your staircase from functional to fabulous. Choose rods that complement your home’s character – brass for traditional spaces, pewter for transitional homes, or even sleek wood for contemporary settings.
When installing, consistency is key. Center your brackets on each stair and ensure they align perfectly from top to bottom. Always drill pilot holes for your bracket screws to prevent splitting, especially in older homes with hardwood stairs.
| Feature | Runner | Full Carpet |
|---|---|---|
| Coverage | Central portion only | Wall-to-wall |
| Cost | Lower material cost | Higher material cost |
| Installation Difficulty | Moderate | More complex |
| Aesthetics | Decorative, shows stair edges | Uniform, complete coverage |
| Replacement | Easier to replace when worn | More involved replacement |
| Noise Reduction | Good | Excellent |
| Safety | Good | Excellent |
Maintenance & Common Mistakes
Regular Maintenance
Your beautiful carpeted stairs need regular care to stay looking their best. Vacuum at least twice weekly, using attachments to reach those tricky corners where dust loves to hide. Address spills immediately by blotting (never rubbing) with a clean cloth.
I always recommend an annual professional steam cleaning to remove embedded dirt and refresh fibers. It’s amazing how much brighter and newer your carpet will look after a proper deep clean. If you’ve installed a runner, consider rotating it periodically to distribute wear more evenly.
Common Mistakes to Avoid
After decades in the flooring business, I’ve seen plenty of stair carpet fitting mistakes. The most common is insufficient stretching – carpet that isn’t properly stretched will develop dangerous wrinkles faster than you can say “trip hazard.”
Improper tackless strip placement is another frequent issue. Place them too close to the edge, and they simply won’t grip properly. Be generous with your stapling too – I recommend placing staples every 3 inches along edges for a secure hold.
Always install with pile running down the risers. This isn’t just about appearance – it dramatically improves longevity as foot traffic naturally pushes down in the same direction as the pile.
And please, don’t skip the underlay! It might seem like an unnecessary expense, but it protects your carpet and significantly extends its life, particularly at the heavily-trafficked nosing.
With proper installation and routine maintenance, your stair carpet should provide years of comfort, safety, and beauty for your home. The extra effort during installation pays dividends in longevity and appearance.
Frequently Asked Questions About Stair Carpet Fitting
How much carpet do I need for a 13-step staircase?
One of the most common questions I hear from homeowners is about calculating carpet quantities. For a standard staircase with 13 treads and 14 risers, you’ll need to do a bit of simple math:
First, measure one tread depth (typically 10-11½ inches) and one riser height (usually 7-7¾ inches). Then use this formula:
(Riser Height × Number of Risers) + (Tread Depth × Number of Treads) + 6 inches waste
For example: (7.5 × 14) + (11.5 × 13) + 6 = 261.5 inches = 21.79 feet
I always recommend rounding up to 22 feet of carpet in this case. If you’re installing a runner, you’ll also need to decide on your desired width (typically 27 or 36 inches).
Remember to account for any landings by measuring and adding this area separately. And if you’ve chosen a patterned carpet, add an additional 12 inches to allow for proper pattern matching. Better to have a little extra than to come up short!
What’s the safest pile height for stairs?
Safety should always be your top priority when selecting carpet for stairs. Low pile carpet (under ½ inch) provides the safest surface by creating clear definition at each stair edge and reducing the risk of catching your foot.
The density of the carpet is just as important as pile height. A dense construction resists crushing and maintains its appearance even in high-traffic areas. I’ve seen many homeowners make the mistake of choosing plush or shag carpets for stairs – these can actually create tripping hazards and should be avoided.
Loop pile or Berber carpets offer excellent durability for stairs, but make sure the loops are tight and small, especially if you have pets whose claws might catch in larger loops.
It’s the combination of pile height and density that matters most. A medium-pile carpet with very high density can actually be safer than a low-pile carpet with poor density. When in doubt, bring home samples and test how they feel underfoot on your stairs.
DIY or professional—what’s the real cost?
The age-old question: tackle it yourself or call in the pros? Let’s break down the costs.
DIY Costs (Materials Only)
Based on internet averages (not KT Flooring pricing):
– Carpet: $2-8 per square foot ($6-24 per linear foot for a 36″ runner)
– Underlay: $0.50-1.50 per square foot
– Tackless Strips: $15-30 total
– Tools: $100-300 if purchased (knee kicker, staple gun, stair tool, etc.)
For a standard staircase, expect to spend $200-600 on materials alone, plus tools if you don’t already have them.
Professional Installation
Based on internet averages (not KT Flooring pricing):
– Labor: $3-7 per step for straight stairs
– Complex Stairs: $5-15 per step for winding or curved stairs
– Premium Installation: Up to $45 per step for intricate patterns or high-end materials
Professional installation typically runs $300-900 for standard stairs, though complex jobs can cost more.
While DIY might seem like the budget-friendly choice, consider these factors before deciding:
Your time investment will be significant – 2-4 hours for experienced DIYers, but 6-8+ hours if you’re new to this. There’s also a substantial learning curve, and mistakes can waste expensive carpet. You might save money by renting tools rather than purchasing them outright.
Many carpet manufacturers require professional installation to maintain warranty coverage. And if your staircase has curves, patterns, or unusual layouts, these can be particularly challenging for novices.
How do I install carpet on bullnose stairs?
Bullnose stairs with their neat curved edges at the bottom add character to your home but require special handling during stair carpet fitting.
Start by creating a precise template of the curved section using heavy paper or cardboard. This extra step saves you from costly mistakes. Cut your carpet slightly larger than needed, then carefully trim for a perfect fit as you go.
For the best results, install the riser carpet first, then the tread. The curved section needs extra attention – secure it with staples every 2 inches to maintain the shape. For a professional finish, either tuck the edges under or use binding tape for clean lines.
The extra effort is worth it – properly carpeted bullnose stairs create a beautiful focal point in your entryway!
How do I handle carpet installation on stairs without risers (open stairs)?
Open or “Hollywood” stairs present unique challenges for stair carpet fitting because everything is visible from below. With no risers to hide your work, precision becomes even more important.
You’ll need to wrap the carpet completely around each tread, which requires more material and careful planning. Install tackless strips on the underside of each tread to secure the carpet properly. Since both the front and back edges will be visible, both must be properly finished.
All your work will be on display from below, so neatness is crucial. If you’re using staples, choose ones that match your carpet color for a more seamless look. Taking your time with each step will result in a clean, professional appearance that improves your open staircase design.
How long does stair carpet typically last?
The lifespan of your stair carpet depends on several factors, with quality being the most important. High-quality nylon or wool carpets typically last 10-15 years, while polyester or olefin options generally provide 5-10 years of service. Budget carpets might need replacement after just 3-5 years.
Your household’s lifestyle significantly impacts longevity. High-traffic homes will naturally see faster wear, while proper underlay extends carpet life by providing crucial cushioning at pressure points. Regular maintenance makes a huge difference too – consistent vacuuming and occasional professional cleaning can add years to your carpet’s life.
Homes with pets and children often see accelerated wear and staining, so if that sounds like your household, consider darker colors or patterned carpets that hide minor wear and spots between cleanings.

Conclusion
Stair carpet fitting transforms one of the most visible and frequently used areas of your home, enhancing both safety and aesthetics. Whether you choose the simpler waterfall method or the more polished cap and band technique, proper installation ensures your stair carpet will provide years of comfort and beauty.
Remember these key takeaways:
- Choose the right carpet – Durable, low-pile options like nylon or wool perform best on stairs
- Don’t skimp on underlay – Quality underlay protects your carpet, especially at the nosing
- Use proper tools – A knee kicker, stair tool, and quality staple gun are essential for professional results
- Take your time with measurements – Accurate measurements prevent costly mistakes
- Consider professional installation for complex staircases with turns, winders, or pattern matching
At KT Flooring, we’ve been changing staircases throughout New Hampshire and Northeast Massachusetts for over 50 years. Our experienced team understands the unique challenges of stair carpet fitting and delivers precise, beautiful results every time.
Whether you’re tackling this project yourself or seeking professional assistance, we hope this guide has provided valuable insights into the art of stair carpet installation. A well-carpeted staircase not only improves your home’s appearance but creates a safer, quieter, more comfortable environment for your family.
Ready to transform your staircase with beautiful, professionally installed carpet? Explore our full carpet installation services or contact us for a free in-home consultation. Our team at KT Flooring is ready to help you select the perfect carpet and ensure flawless installation for your unique staircase.
