Why Proper Floor Transitions Matter for Your Home
Learning how to transition carpet to laminate properly can save you from costly mistakes and create a seamless, professional look between your rooms. Here’s what you need to know:
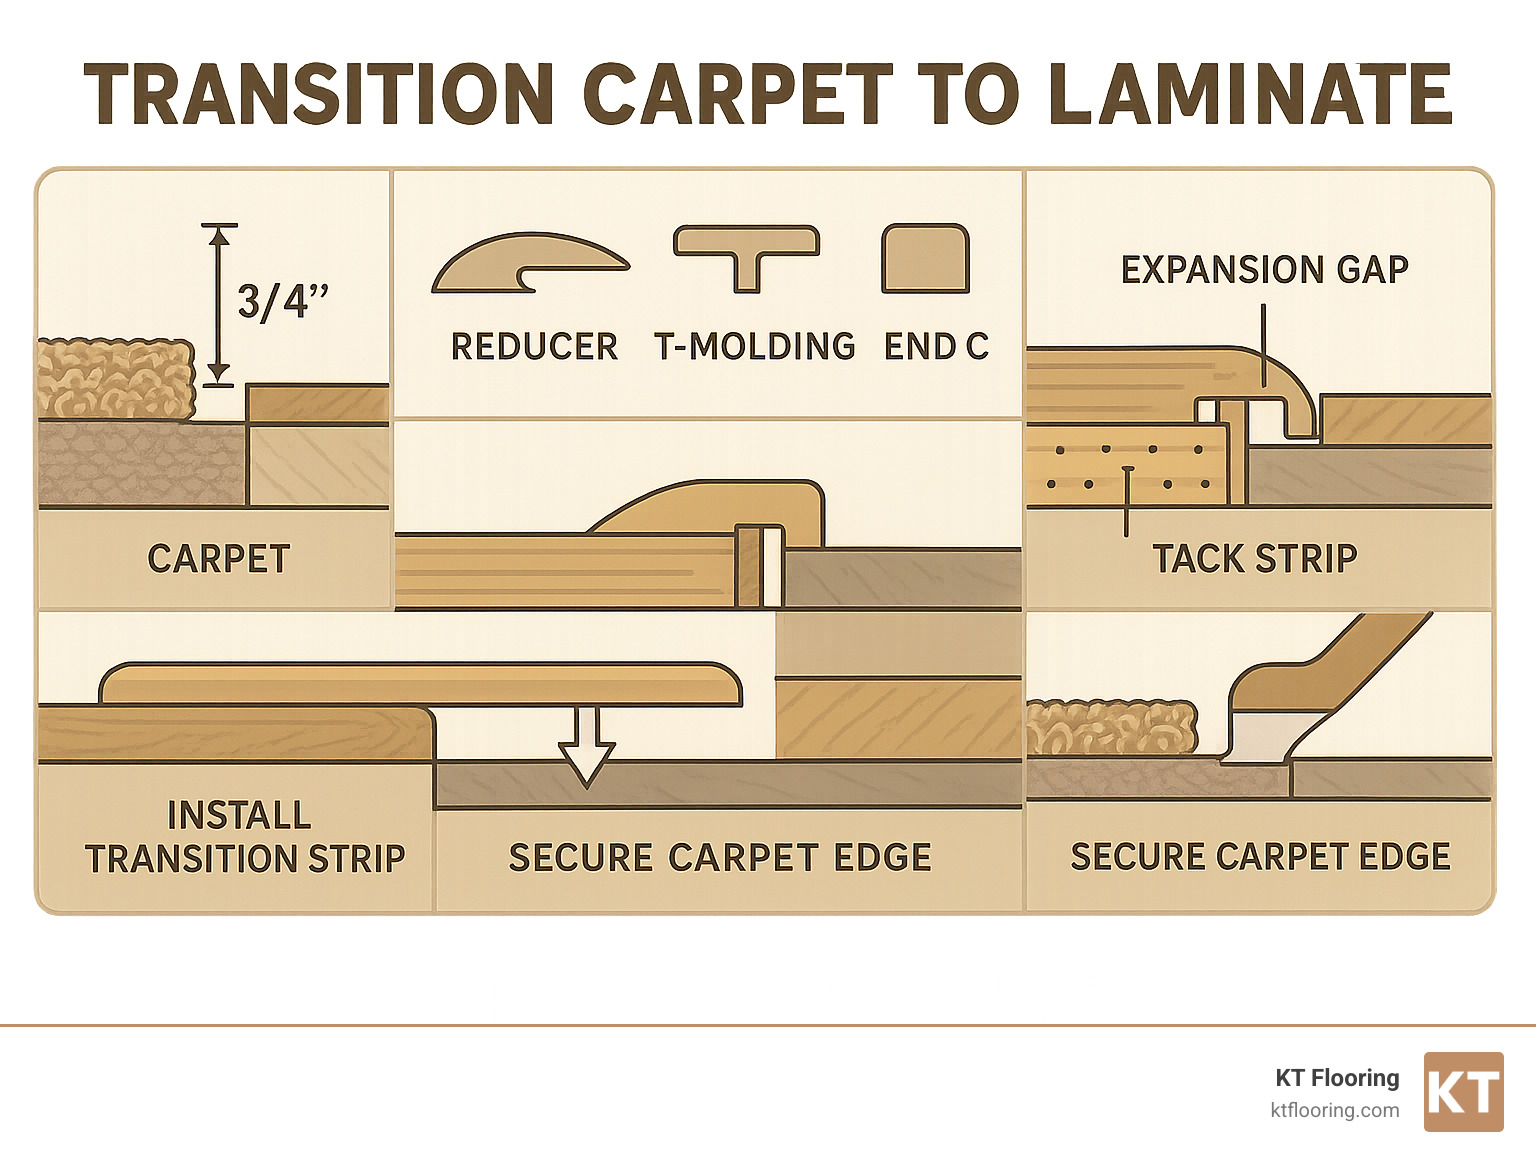
Essential Steps to Transition Carpet to Laminate:
1. Measure height difference between carpet and laminate surfaces
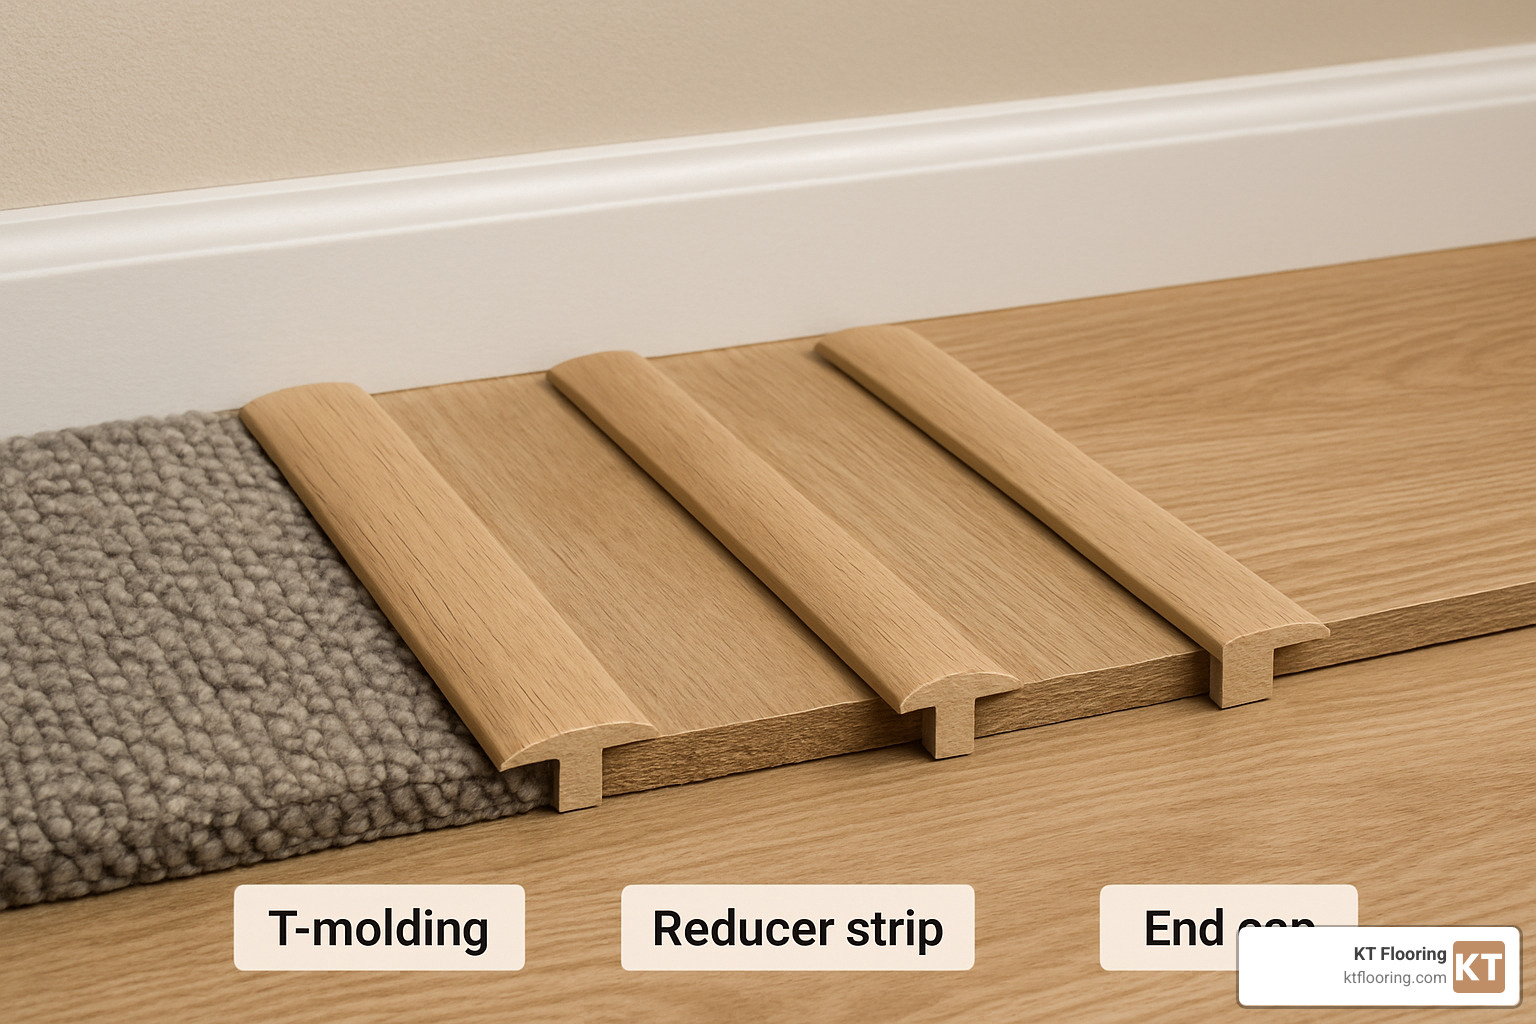
2. Choose the right transition strip (reducer, T-molding, or end cap)
3. Prepare both edges by installing tack strips and leaving expansion gaps
4. Install the transition strip using adhesive, screws, or snap-in method
5. Secure carpet edge and ensure smooth, safe connection
The height difference between carpet and laminate creates the biggest challenge. Most carpets sit about 3/4″ to 1″ above the subfloor, while laminate typically measures around 3/8″ thick. This mismatch can create tripping hazards and unsightly gaps without proper transition strips.
Based on customer reviews from popular transition strips, homeowners report that self-adhesive options work well for DIY projects, while screw-down strips offer better long-term durability in high-traffic areas.
As Christopher Talty, owner of KT Flooring with over 50 years of experience serving New Hampshire homes, I’ve helped countless homeowners successfully transition carpet to laminate without the common pitfalls.
Find more about transition carpet to laminate:
– changing carpet to laminate cost
– install carpet
– stair carpet fitting
What Is a Transition Strip & Why You Need One
Picture this: you’ve just installed beautiful new laminate flooring in your living room, but it meets your hallway carpet with an awkward bump and a visible gap. That’s exactly where a transition strip comes to the rescue.
A transition strip is essentially the peacemaker between two different flooring types. When you transition carpet to laminate, you’re dealing with materials that have completely different thicknesses, textures, and installation requirements. The strip creates a smooth bridge that makes both floors look like they were always meant to be neighbors.
The main job of your transition strip is edge protection – it shields your carpet from fraying and prevents your laminate from chipping at the edges. Without this protection, you’ll start seeing frayed carpet fibers and damaged laminate planks within just a few months of normal foot traffic.
Here’s something many homeowners don’t realize: laminate flooring needs that expansion gap of about 1/4 inch around all edges. It’s not optional – it’s required for the flooring to expand and contract with temperature changes. A transition strip cleverly hides this gap while still allowing the laminate to move freely.
The safety aspect can’t be ignored either. That height difference between carpet and laminate creates a serious tripping hazard, especially for kids, elderly family members, or anyone walking through in dim lighting.
Key Components of a Strip
Every transition strip has three essential parts that work together to create that seamless connection.
The top profile is what you actually see and walk on. This curved, flat, or angled surface creates the smooth pathway between your floor heights. The channel or base does the heavy lifting, either sticking directly to your subfloor with adhesive or snapping into a separate track system.
The fastening method determines how permanent and secure your installation will be. Self-adhesive strips work great for DIY projects. Screw-down options offer rock-solid durability for high-traffic areas. Snap-in systems give you the best of both worlds.
Common Transition Mistakes to Avoid
After helping New Hampshire homeowners for over five decades, we’ve seen the same mistakes pop up again and again.
Height mismatch is the big one. Homeowners often guess at their floor height difference instead of measuring carefully. Always measure the actual installed heights before shopping for strips.
Loose carpet around the transition area spells trouble. The carpet needs proper stretching and securing right up to the transition point.
We’ve also seen people rush the cure time for adhesive strips. Most adhesives need a full 24 to 48 hours to reach maximum strength, especially important in New Hampshire’s changing humidity levels.
Choosing the Right Transition Strip for Carpet-to-Laminate
Walking into a flooring showroom can feel overwhelming when you’re staring at dozens of transition strip options. After helping New Hampshire and Northeast Massachusetts homeowners for over five decades, we’ve learned that the right choice comes down to understanding your specific situation.
Floor height relationship drives everything else. Most carpets sit about an inch above the subfloor when you factor in padding, while laminate typically measures around half an inch with underlayment. This height difference means you’ll almost always need a reducer strip rather than flat T-molding.
Material compatibility and traffic rating are equally important considerations.
| Installation Method | Pros | Cons | Best For |
|---|---|---|---|
| Self-Adhesive | Easy DIY installation, no tools required, removable | May fail over time, limited to smooth subfloors | Low-traffic areas, temporary solutions |
| Screw-Down | Maximum durability, works on any subfloor | Requires drilling, permanent installation | High-traffic doorways, commercial applications |
| Snap-In | Combines ease with durability, replaceable top | Requires track installation, higher cost | Medium-traffic areas, future flexibility |
Measuring Your Flooring Heights
Getting accurate measurements to transition carpet to laminate properly requires more finesse than just laying a ruler across the surface.
Compress the carpet first by stepping on it near the edge where your transition will go. This shows you how thick it actually is when people walk on it daily. Measure from the subfloor up to this compressed surface.
Add your underlayment thickness to the laminate measurement. That 2-4mm might seem insignificant, but it’s often the difference between a smooth transition and a noticeable bump.
Most standard carpet with padding hits about 1″ total thickness, while 8mm laminate with underlayment typically measures around 1/2″. That 1/2″ gap explains why reducer strips are far more common than T-molding for carpet-to-laminate transitions.
Strip Types & Cost Ranges
T-molding creates a small ridge that works beautifully when both surfaces sit at nearly identical heights. However, never use T-molding where laminate meets carpet – it lacks proper support on the carpet side.
Reducer strips handle the heavy lifting in most carpet-to-laminate situations. They slope gradually from the higher carpet surface down to the lower laminate.
End caps come into play when your laminate terminates at carpet rather than continuing into another room.
Rubber ramps serve a special purpose for accessibility needs, creating gentle slopes that accommodate wheelchairs and walkers.
Based on internet data, average costs range from $8-$45 per linear foot, with specialty or custom strips reaching up to $135 per linear foot. These are average internet costs and not KT Flooring pricing.
Accessibility & Safety Considerations
Throughout our service areas in Massachusetts and New Hampshire, we encounter homes where wheelchair-friendly options make all the difference. Rubber ramps with gradual slopes work far better than abrupt height changes.
Pet claws present their own challenge. Sharp-edged metal strips can damage or catch dog and cat claws. Rounded profiles or rubber materials provide much safer options for pet-friendly homes.
When to Custom-Paint or Stain
Unfinished hardwood transition strips offer the ultimate flexibility for matching your home’s unique style. We typically recommend this route when your laminate features unusual coloring that doesn’t match standard strip finishes.
Color-matching your trim work creates a cohesive look throughout the room. Just remember to allow 48-72 hours for custom finishes to fully cure before installation.
Tools, Materials & Sub-Floor Prep

Getting your tools and workspace ready makes the difference between a smooth installation and a frustrating day of running back and forth to the hardware store.
Your utility knife needs fresh blades – dull blades tear carpet fibers instead of cutting them cleanly. A multi-tool or oscillating saw handles precise cuts around door jambs. Your drill should have both pilot bits for screws and mixing attachments if you’re using two-part adhesives.
Don’t forget the finishing tools. A rubber mallet seats transition strips without denting them, while a knee kicker or power stretcher keeps carpet properly tensioned during installation.
For materials, your transition strip should already be cut to length with about 1/8″ extra for final trimming. Construction adhesive works for most applications, though some installations require screws for maximum holding power. Carpet tack strips and latex-based carpet seam sealer complete your material list.
Subfloor preparation often gets rushed, but it’s absolutely critical for long-term success. Remove every staple, nail, and chunk of old adhesive from previous flooring. These seemingly minor bumps telegraph through your transition strip and create squeaks.
Check for loose boards or squeaks by walking across the area. New Hampshire’s seasonal temperature swings can loosen fasteners over time, and fixing these issues now prevents callbacks later.
Moisture levels in our New England climate can surprise you. Use a moisture meter to verify your subfloor stays below 12% moisture content. According to scientific research on moisture barriers, proper moisture control prevents most flooring failures in transitional climates like ours.
Preparing Carpet Edge
The carpet edge preparation determines whether your finished transition carpet to laminate looks professional or obviously DIY.
Tack strip placement needs precision – position it about 3/8″ away from where your transition strip will sit. This distance lets the carpet hook onto the tacks while leaving room for the strip base.
Stretch the carpet back from your work area without cutting anything yet. You need working space, but you also need extra material for final adjustments.
Trim excess carpet only after the transition strip is completely installed and secured. Leave about 1/4″ extra material for tucking into the strip channel.
Preparing Laminate Edge
Expansion gaps aren’t optional – they’re essential for preventing buckling when the laminate expands and contracts. Maintain the manufacturer’s recommended gap, typically 1/4″, between your laminate and the transition strip base.
Undercutting door jambs requires patience and the right tool. Use an oscillating saw to cut the jamb just high enough for your laminate to slide underneath.
Dust-free surfaces make or break adhesive bonds. Vacuum thoroughly, then wipe down with a slightly damp cloth to capture fine dust particles.
Step-by-Step Installation: Transition Carpet to Laminate
Here’s where the rubber meets the road – or in this case, where the carpet meets the laminate! After five decades of perfecting this process for homeowners throughout New Hampshire and Massachusetts, we’ve learned that patience and precision make all the difference.
Dry-Fit & Mark Reference Line
Think of this step as your dress rehearsal. Place your transition strip exactly where it will live permanently. When you transition carpet to laminate, this positioning is critical – the strip needs to cover that expansion gap while giving you enough room to tuck the carpet edge properly.
Grab your pencil and mark the exact position on your subfloor. This reference line becomes your North Star during installation.
Center the channel carefully if you’re using a two-piece system. The channel should sit right over your reference line, with the visible top profile positioned slightly toward the carpet side.
Fasten the Base or Apply Adhesive
Now for the moment of commitment. Different fastening methods require different approaches, but they all demand attention to detail.
Self-adhesive strips seem foolproof, but that subfloor needs to be spotless – we’re talking damp-cloth-clean, then completely dry. Peel that backing paper slowly and press firmly from one end to the other. Air bubbles are your enemy here.
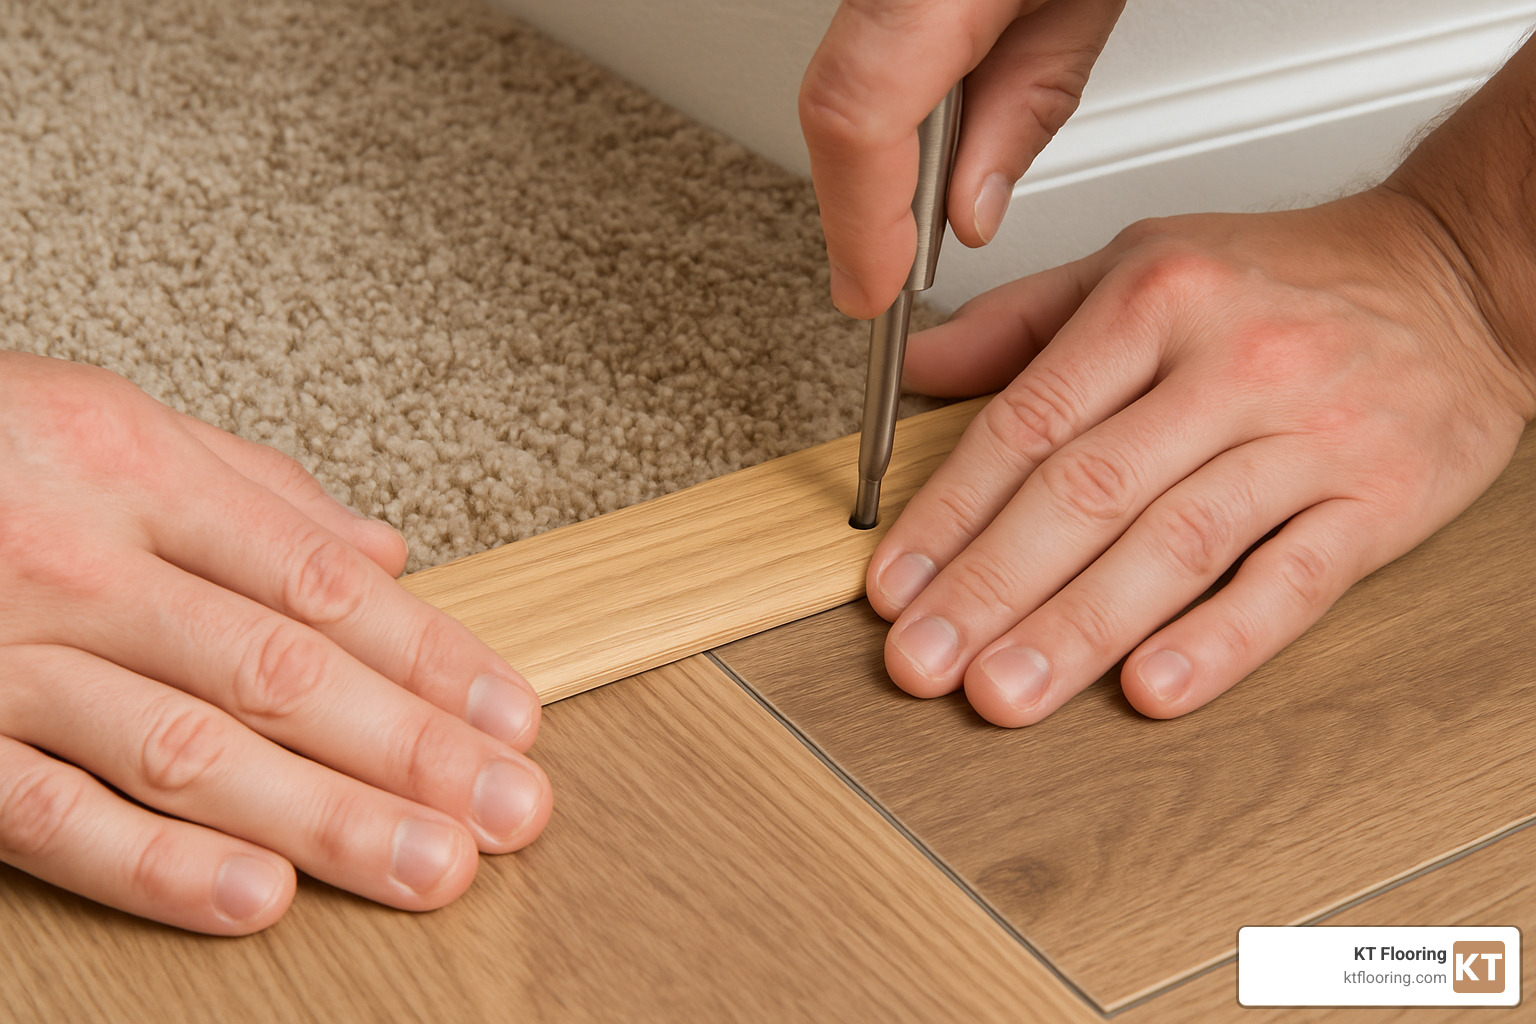
Screw-down installation offers the most security, especially in our New England homes where seasonal temperature changes can stress adhesive bonds. Drill pilot holes every 8 to 12 inches. Use wood screws for plywood subfloors, masonry screws for concrete.
Snap-track systems give you the best of both worlds – security plus the ability to replace the top profile if it ever gets damaged. Get that track perfectly straight during installation.
Re-Secure Carpet & Snap-In Top Profile
Here’s where your carpet installation skills really matter. Proper carpet tension separates the pros from the weekend warriors every single time.
If you’re working in a room larger than 10 feet, do yourself a favor and rent a power stretcher. Your knee kicker might seem adequate, but it simply can’t provide the tension needed for a lasting installation.
Hook those carpet fibers onto the tack strip teeth like your project depends on it – because it does! The carpet backing needs to grab those angled teeth securely.
For two-piece transition systems, align that top profile carefully before snapping it down. You should hear or feel a satisfying click when it locks into place.
Final Inspection & Safety Check
This final step separates good installations from great ones. Run your hand slowly across the entire transition, feeling for any raised edges or rough spots.
Test the carpet edge with a gentle tug. If it pulls away from the transition, you need to re-stretch and re-secure it now.
Vacuum everything thoroughly, paying special attention to that transition channel where debris loves to hide.
When you’ve successfully learned how to transition carpet to laminate, you’ve mastered one of the trickier aspects of flooring installation.
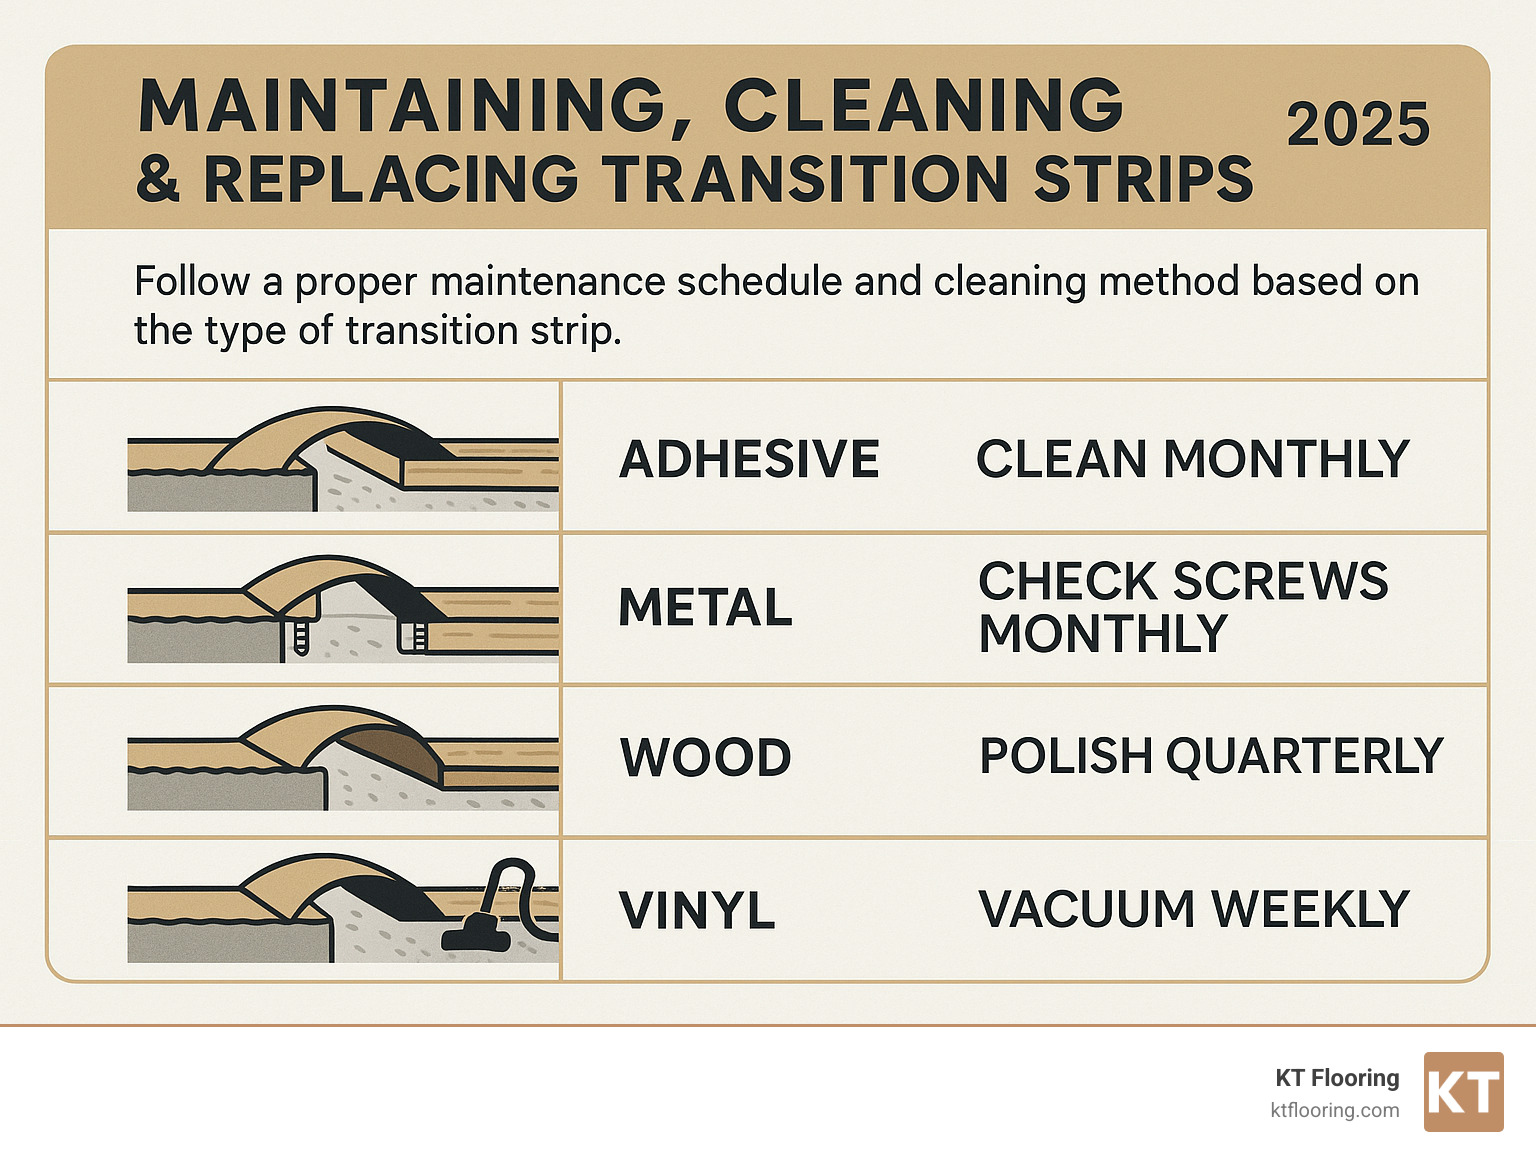
Maintaining, Cleaning & Replacing Transition Strips
Your beautiful transition carpet to laminate installation deserves proper care to maintain its professional appearance and safety.
Routine vacuuming should happen weekly, focusing on the channel where debris loves to hide. Those tiny carpet fibers and dust particles can build up quickly.
Monthly inspections take just a few minutes but can save you from bigger problems. Check for loose screws, lifting edges, or any gaps that might have developed. New England’s seasonal humidity changes can cause both carpet and laminate to expand and contract.
Damp wiping works for most cleaning situations, but keep that cloth barely damp. Too much moisture can damage adhesives or cause wood strips to swell.
Pet accidents require immediate attention with enzyme-based cleaners. These cleaners break down odor-causing bacteria and prevent the smell from setting into your transition materials.
Most quality transition strips last 10-15 years with proper care, though high-traffic doorways between busy rooms might need replacement sooner. Signs it’s time for a new strip include visible cracking, significant wear patterns, or loose installation that can’t be tightened.
For more comprehensive guidance about maintaining your flooring investment, check out our flooring repair services.
High-Traffic & Doorway Strategies
Doorways between your kitchen and living room, or main hallways, see thousands of footsteps every month. These areas need extra attention and sometimes different materials.
Metal thresholds offer maximum durability in extremely high-traffic areas. While they cost more upfront, aluminum or brass options can handle heavy foot traffic without showing wear for decades.
Annual tightening should be part of your home maintenance routine. Even the best installation gradually loosens over time as foot traffic creates tiny vibrations.
Reading Customer Reviews Before Buying
Real customer experiences often reveal details that manufacturer specifications miss. Smart shoppers read reviews to understand how products perform in actual homes, not just test labs.
Self-adhesive strips consistently receive praise for easy installation, with many DIY homeowners successfully completing their projects without professional help. However, some reviewers note that proper surface preparation makes a huge difference in long-term performance.
Screw-down options earn high marks for durability, especially from customers in high-traffic areas. The extra installation effort pays off in longevity, according to most user experiences.
Latest reviews on self-adhesive strips highlight the importance of following manufacturer instructions for cure time and surface preparation.
Frequently Asked Questions about Carpet-to-Laminate Transitions
After five decades of helping homeowners throughout New Hampshire and Northeast Massachusetts, we’ve heard just about every question imaginable when it comes to flooring transitions. Here are the most common concerns we address during our consultations.
What if my laminate is higher than my carpet?
This scenario catches many DIY enthusiasts off guard, but it’s not as rare as you might think. Thick luxury vinyl plank or high-end laminate can sometimes sit higher than low-pile carpet, especially if you’re dealing with older, compressed carpet padding.
Your best solution is a reverse reducer strip – essentially a standard reducer flipped to slope from the higher laminate down to the lower carpet. These strips provide proper support for the laminate edge while creating a smooth transition.
Never attempt to use standard T-molding in this situation. Without proper support on both sides, T-molding will crack under foot traffic.
Can I install a strip on concrete without drilling?
Absolutely, though your success depends on the specific conditions and traffic expectations. High-quality construction adhesive can create a strong bond with concrete, but preparation is everything.
The concrete must be completely clean, dry, and dust-free. Any residue from previous flooring, paint, or sealers will prevent proper adhesion. We recommend using a concrete etching solution if the surface seems too smooth or sealed.
Temperature matters tremendously with adhesive installations. Cold concrete in New England basements can prevent proper curing, while hot summer concrete can cause adhesives to set too quickly.
For high-traffic doorways or commercial applications, we still recommend drilling and using concrete screws.
How long does adhesive need to cure before walking on it?
This question keeps many homeowners awake at night, especially when the transition blocks their main walkway. Most construction adhesives require 24-48 hours for full cure, but New England’s variable climate adds complications.
Temperature and humidity significantly affect cure times. Our humid summer months can extend cure times, while dry winter air may accelerate the process. We always recommend waiting the full 48 hours before allowing normal foot traffic.
Here’s a practical tip from our decades of experience: Plan your installation timing around your family’s schedule. Friday evening installations give you the full weekend for curing.
If you’re in a rush, consider mechanical fastening methods instead of adhesive. Screw-down strips can handle foot traffic immediately after installation.
Conclusion
Congratulations! You’ve now learned everything you need to successfully transition carpet to laminate like a pro. The journey from measuring that tricky height difference to enjoying your seamless, safe floor transition doesn’t have to be overwhelming when you follow the right steps.
The secret to a professional-looking result lies in taking your time with the details. Measuring accurately, choosing the right reducer strip for your specific height difference, and properly preparing both the carpet edge and laminate expansion gap will make all the difference between a job you’re proud of and one that screams “DIY gone wrong.”
Don’t let that height difference between your carpet and laminate intimidate you. Most homeowners find their carpet sits about 1/2″ higher than their laminate – a perfect scenario for a reducer strip. And yes, those tack strips really do matter for keeping your carpet edge secure over the years.
The most common mistake we see? Rushing the adhesive cure time. We know it’s exciting to walk on your beautiful new transition, but giving that adhesive a full 48 hours to cure in New Hampshire’s changing weather will save you from having to redo the entire project later.
After five decades of helping homeowners throughout New Hampshire and Northeast Massachusetts create beautiful, functional floor transitions, we’ve learned that every home presents unique challenges. Maybe your subfloor isn’t perfectly level, or perhaps you’re dealing with an unusual height difference that requires a custom solution.
When to call in the professionals? If you’re facing concrete subfloors, complex doorway configurations, or accessibility requirements, our team at KT Flooring brings the experience and specialized tools that can turn a frustrating project into a smooth, stress-free experience.
Whether you tackle this as your next weekend project or decide you’d rather leave it to the experts, you now have the knowledge to make informed decisions about your flooring transition. Your family’s safety and your home’s beautiful appearance are worth doing it right the first time.
Ready to transform that awkward carpet-to-laminate junction into a seamless, professional transition? Contact us for your free consultation, or explore our comprehensive flooring installation services to see how we can help make your flooring dreams a reality.
